
Simultaneous use of multiple OpenVPNs on one server
November 25, 2021
You can simultaneously use several OpenVPN processes on the same server, while they will work on different ports and provide separate virtual private networks that do not overlap with each other.
Multiple instances of OpenVPN are provided out of the box, but additional configuration is required.
1. OpenVPN services must use different ports
All OpenVPN services must use a free port. Remember that the same UDP and TCP port numbers are different ports, that is, you can use the same port number in two instances of OpenVPN, provided that one of them is a UDP port and the other is a TCP port.
If two OpenVPN services use the same port, then the OpenVPN instance that is started first will work without error, and the second instance will not start due to the error “TCP/UDP: Socket bind failed on local address [AF_INET][undef]:…: Address already in use (errno=98)”, for example:
2021-11-02 09:26:50 us=736094 TCP/UDP: Socket bind failed on local address [AF_INET][undef]:53: Address already in use (errno=98)
2021-11-02 09:26:50 us=736216 Exiting due to fatal error
2. Range of addresses of the virtual private network
By default, a range of IP addresses for a virtual private network is specified in the server configuration file, for example:
server 10.8.0.0 255.255.255.0
Additional instances of the OpenVPN service must use different ranges. For example, for the second service, you can specify the following range:
server 10.8.1.0 255.255.255.0
For the third service, you can specify the following range of IP addresses, and so on:
server 10.8.2.0 255.255.255.0
3. Traffic routing for all virtual private networks
The section “Enable traffic routing on the OpenVPN server” shows how to enable NAT for VPN traffic so that clients can make connections to the Internet. The example in the above section shows how to configure routing for traffic from the 10.8.1.0/24 subnet. Since additional instances of the OpenVPN service use different subnets (for example, 10.8.1.0/24), in order for the clients of these virtual networks to access the Internet, you must configure routing for each of these networks.
An example of the original contents of the /root/bin/vpn_route.sh file:
#!/bin/sh

# specify the name of the interface, otherwise the script will try to select it automatically
#DEV='eth0'
DEV='ens3'
PRIVATE=10.8.0.0/24

if [ -z "$DEV" ]; then
	DEV="$(ip route | grep default | head -n 1 | awk '{print $5}')"
fi
# Turn forwarding packets on from the tunnel interface
# they got to the external interface
sysctl net.ipv4.ip_forward=1
# Make sure iptables do not block redirected traffic:
iptables -I FORWARD -j ACCEPT
# Network Address Translation (NAT) for packets coming from the tunnel
# When forwarding is enabled, packets are forwarded by default.
# with the original address unchanged, that is, in our case 10.8.0.*
# such packages are either deleted at the ISP gateway, or even if they are
# go to the destination, the answer never finds a way back.
# These private addresses are not routed to the Internet.
#
# The solution is Network Address Translation (NAT) of outgoing traffic,
# i.e. replace private 10.8.0.* address with the public IP address of the VPN server.
# This will allow responses to reach the VPN server,
# and there they will be sent back to the tunnel.
iptables -t nat -I POSTROUTING -s $PRIVATE -o $DEV -j MASQUERADE
The file /root/bin/vpn_route.sh which has added NAT for subnets 10.8.1.0/24, 10.8.2.0/24, and 10.8.3.0/24:
#!/bin/sh

DEV='ens3'
PRIVATE=10.8.0.0/24

if [ -z "$DEV" ]; then
	DEV="$(ip route | grep default | head -n 1 | awk '{print $5}')"
fi

sysctl net.ipv4.ip_forward=1

iptables -I FORWARD -j ACCEPT

iptables -t nat -I POSTROUTING -s $PRIVATE -o $DEV -j MASQUERADE

iptables -t nat -I POSTROUTING -s 10.8.1.0/24 -o $DEV -j MASQUERADE

iptables -t nat -I POSTROUTING -s 10.8.2.0/24 -o $DEV -j MASQUERADE
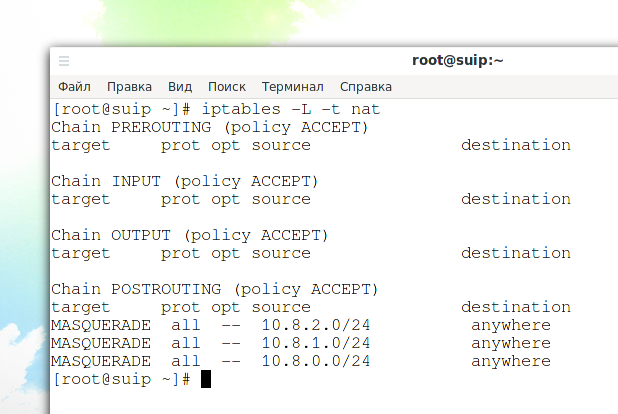
To check the NAT settings, run the command
iptables -L -t nat
4. Configuring local static addresses
If you used the section “How to make static IPs for OpenVPN clients” and added entries like “ifconfig-push 10.8.0.10 255.255.255.0” to the file “/etc/openvpn/ccd/client1”, then you need to use different client names for the second and subsequent OpenVPN networks as they use different VPN IP ranges.
5. Starting and adding the second and subsequent OpenVPN services to startup
Note that with systemctl you can use a command like
openvpn-server@<configuration>.service
where <configuration> is a configuration file located in the /etc/openvpn/server/ folder, but without the .conf extension
For example, the second configuration file for the second instance of the OpenVPN service is placed in the /etc/openvpn/server/server-tcp.conf file, then the program for starting the service is as follows:
sudo systemctl start openvpn-server@server-tcp.service
Checking the status of the service with the server-tcp.conf configuration file:
systemctl status openvpn-server@server-tcp.service
View OpenVPN service errors with server-tcp.conf config file:
journalctl -xeu openvpn-server@server-tcp.service
Add service to startup:
sudo systemctl enable openvpn-server@server-tcp.service
See also:
- How to use OpenVPN with TCP protocol
- How to set up OpenVPN server and clients
- OpenVPN advanced usage examples
Related articles:
- How to change configuration files when migrating from OpenVPN 2.4.* to OpenVPN 2.5.* (100%)
- How to use OpenVPN with TCP protocol (100%)
- Comparison of performance (data transfer rate) of OpenVPN over UDP and TCP (100%)
- How to manage VPN Settings in Cinnamon (73.6%)
- How to manage VPN Settings in Xfce (73.6%)
- How to run multiple instances of an application from the Panel in Cinnamon (RANDOM - 50%)