How to add text to images in ImageMagick
August 16, 2022
This post covers examples of using “magick” to add text to photos. The “magick” utility is part of the ImageMagick package. For details on installing ImageMagick, including which dependencies need to be installed to support the maximum number of formats, as well as a description of the command structure, examples of usage and all options, see the article: ImageMagick guide: installing, using, and troubleshooting.
Text output in ImageMagick, on the one hand, is very flexible and allows you to configure any text parameters, but on the other hand, because of this flexibility, it is somewhat confusing, since there are a large number of options for setting text.
Adding a caption to ImageMagick is possible with:
- label: – is an image type intended for creating files representing labels or for adding labels to images
- caption: – is another type of image that differs from label: in that instead of increasing the text size to the specified “-size” parameter, it wraps any long lines that do not fit into the specified “-size” width. That is, long text is split into lines.
- text: – is another type of image, the purpose of which is to convert large texts into a graphic format.
- -draw – is an option that gives the command to draw one or another graphical primitive. Text is also present among graphic primitives. Currently, as a text output, it has somewhat lost its relevance due to the addition of the following option.
- -annotate – is another option designed to conveniently add text to an image. This option uses -draw, and is intended by the author of the program as a easier and more powerful alternative to this option.
In addition to the named options, you can also note the options that are primarily responsible for metadata, but sometimes their value is also displayed along with the picture:
- -label
- -comment
- -caption
What to use to display text on images in ImageMagick – label:, caption: or -annotate?
To add an inscription to the image in the choice between “-annotate” and “-draw”, we will use the advice of the author of the program and we will use “-annotate”.
As far as “label:” and “caption:” are concerned, these images also have some advantages. For example, “caption:” can distribute long text into lines so that it fits in a certain area. And “label:” knows how to select the font size so that it fits best into the given size.
But with all its capabilities, “label:” and “caption:” are still images, so when you add text to them, it has a background. However, if desired, the background can be made transparent.
The “-annotate” option can also output text with the specified background color, but by default it only outputs text without any background.
All three variants (“label:”, “caption:” and “-annotate”) can display multiline text, but only “caption:” can automatically span text across multiple lines.
In general, “-annotate” seems to be a more universal option when you need to add text to an image.
The “label:” and “caption:” options are best suited when you need to add a caption not on the image itself, but below or above it, or even on the image, but on the background and within the specified size. Also “label:” and “caption:” are handy when you need to create a new image consisting of a caption, such as a button for a web interface.
Options for -annotate
This section contains all the options that affect the text shown with -annotate. Further, each of the options is considered in more detail and examples of its use are given, and this section can be used as a quick reference to quickly find the desired option.
If any option related to -annotate is missing, then write about it in the comments.
- -pointsize. Font size.
- -font. The name of the font.
- -family. Font family.
- -fill. Font color.
- -stroke. Stroke (outline) color.
- -strokewidth. Stroke thickness.
- -style. Style, for example, italic, oblique, normal.
- -undercolor. Undercolor (background) color.
- -gravity. Sets the origin.
- -weight. The font weight that is trying to apply to the Font family.
- -antialias. Turns anti-aliasing on and off.
- -kerning. Distance between two letters.
- -interword-spacing. Distance between two words.
- -interline-spacing. The distance between two lines.
-
-stretch. Deprecated and removed. -
-text-font. Deprecated and removed.
How to add text to an image on the Linux command line
To add text, use the -annotate {+-}tx{+-}ty TEXT option
In this line:
- {+-}tx – horizontal offset in pixels from the center of gravity (by default, from the upper left corner)
- {+-}ty – vertical offset in pixels from the center of gravity (by default, from the upper left corner)
- TEXT – text to add to the image
The following command will add the inscription “zaLinux.ru” to the photo, shifting it from the left border by 20 pixels and from the top by 50 pixels:
magick IMAGE.jpg -annotate +20+50 'zaLinux.ru' test40.jpg
By default, text is black and has a very small font size. Therefore, if you do not see the text, then go to the next option.
How to change font size in ImageMagick
To change the size, use the -pointsize SIZE option.
Command example:
magick IMAGE.jpg -pointsize 72 -annotate +20+50 'zaLinux.ru' test40.jpg
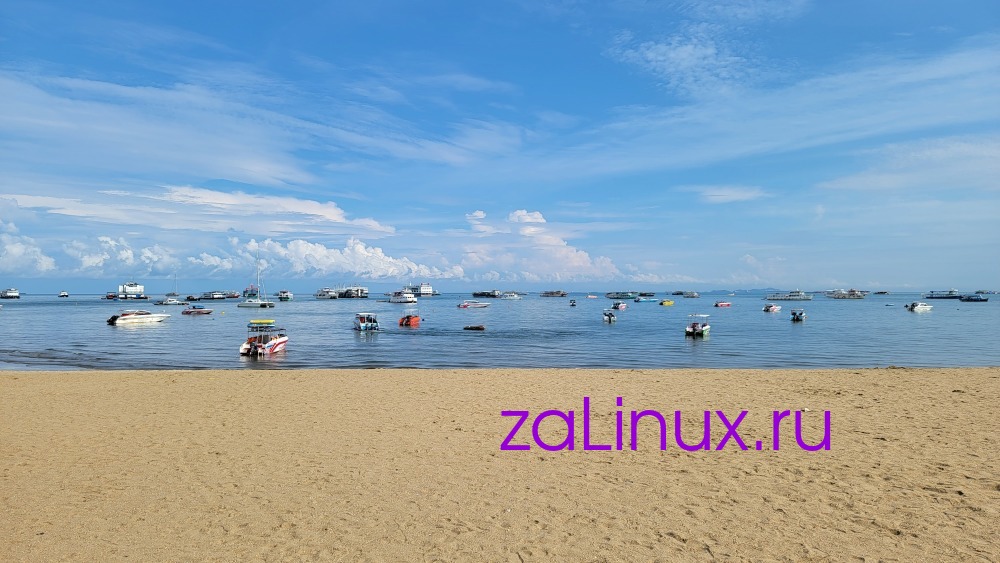
How to change font color in ImageMagick
To change the font color, use the -fill COLOR option. This parameter accepts a color name, a hexadecimal color, or an RGB, RGBA, HSL, HSLA, CMYK, or CMYKA numeric specification. You can see the names of all colors in the How to specify color in ImageMagick section.
Enclose the color specification in quotation marks so that “#” or parentheses are not interpreted by your shell.
Colors can be specified in the following format (the list is not complete, see the previous link for more details):
- -fill blue
- -fill "#ddddff"
- -fill "rgb(255,255,255)"
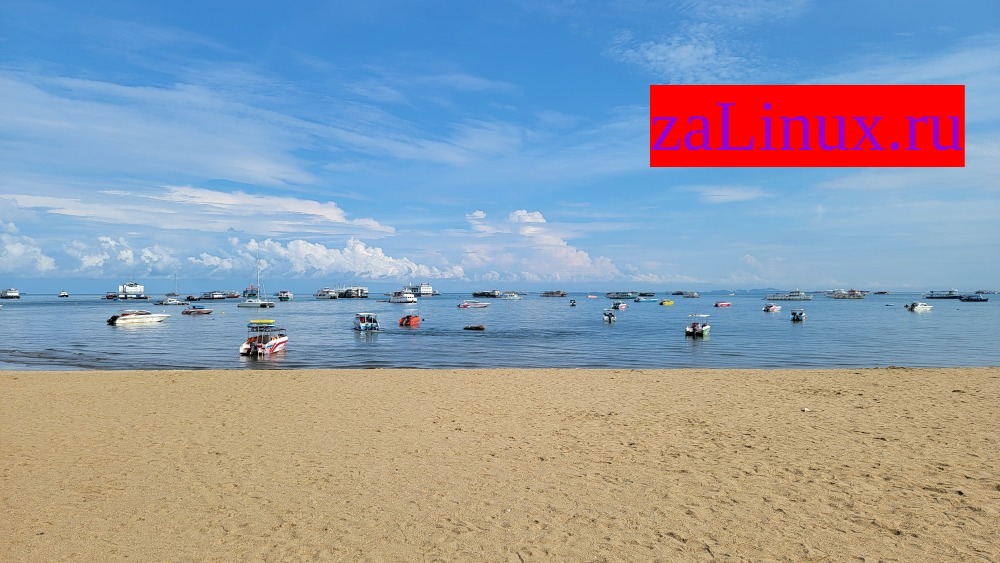
An example of a command that will write the text “zaLinux.ru” on the photo IMAGE.jpg with a size of 72 pt and the color DarkViolet, the text will be placed with an indent of 500 pixels from the left edge of the image and 450 pixels from the top edge, the file with the inscription will be saved with the name test40. jpg:
magick IMAGE.jpg -pointsize 72 -fill DarkViolet -annotate +500+450 'zaLinux.ru' test40.jpg

How to change font in ImageMagick
Use the -font FONT NAME option to select a font. This option will set the font to be used when annotating images with text or creating labels.
The command will show the full list of fonts:
magick -list font
For each font, information from several lines will be displayed, the line with the name of the font begins with “Font:”. It is this name that must be used with the -font option.
In addition to the fonts listed in the predefined list above, you can also specify a font from a specific source. For example, Arial.ttf is a TrueType font file, ps:helvetica is a PostScript font, and “x:fixed” is an X11 font.
To explicitly name a file or collection of fonts, specify the path to the font preceded by the @ character, such as @arial.ttf. You can specify the font weight index for font collections, eg @msgothic.ttc[1].
The following command adds a caption using the Utopia-Regular font:
magick IMAGE.jpg -font Utopia-Regular -pointsize 72 -fill DarkViolet -annotate +500+450 'zaLinux.ru' test41.jpg
The result of the following command
magick IMAGE.jpg -font Utopia-Regular -pointsize 72 -fill DarkViolet -annotate +500+150 'zaLinux.ru' -font Ubuntu -pointsize 72 -fill DarkViolet -annotate +500+250 'zaLinux.ru' -font Cormorant-Unicase-Bold -pointsize 72 -fill DarkViolet -annotate +500+350 'zaLinux.ru' -font Times-New-Roman -pointsize 72 -fill DarkViolet -annotate +500+450 'zaLinux.ru' -font Liberation-Serif -pointsize 72 -fill DarkViolet -annotate +500+550 'zaLinux.ru' test41.jpg
How to specify a font family
The -family FONT FAMILY option sets the font family for the text.
This setting suggests the font family that ImageMagick should try to use to render text. If a family can be found, it is used; if not, the default font is substituted (for example, “Arial”) or a family known to be similar (for example, “Courier” can be used if “System” is requested but not found). Note that the family can be a list of CSS style fonts.
If the FONT FAMILY name contains spaces, then put it in quotation marks, for example, the following command specifies the URW Gothic font-family:
magick IMAGE.jpg -family 'URW Gothic' -pointsize 72 -fill DarkViolet -annotate +500+450 'zaLinux.ru' test42.jpg
How to stroke text
With the two options -stroke STROKE COLOR and -strokewidth STROKEWIDTH, you can specify the color and thickness of the text stroke.
For example, in the following command, the text in the DarkViolet font is selected, the stroke color is black, and the stroke weight is set to 3:
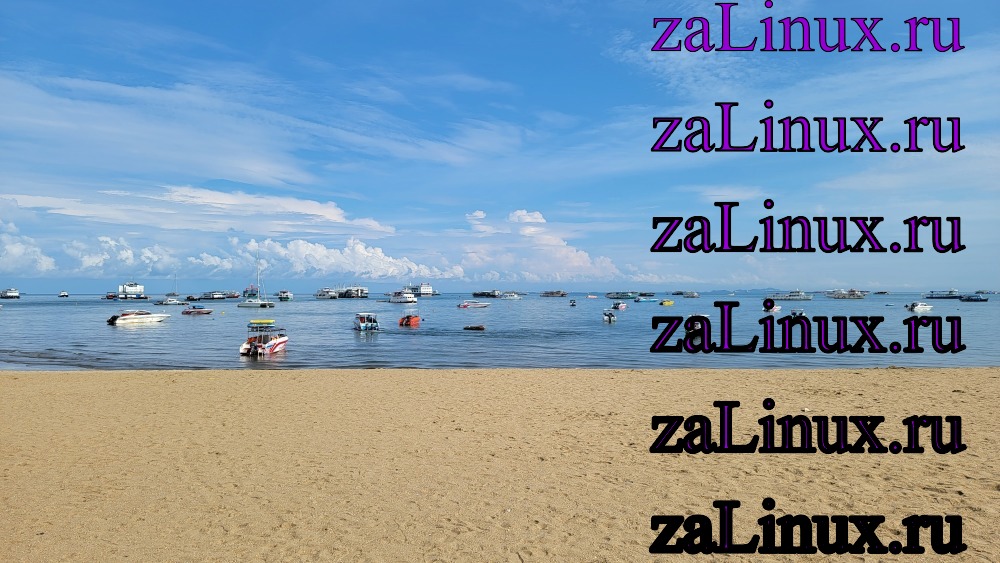
magick IMAGE.jpg -stroke black -strokewidth 3 -font Times-New-Roman -pointsize 72 -fill DarkViolet -annotate +500+550 'zaLinux.ru' test43.jpg
The result of the command execution (shown strokes with a width of 1 to 5):
magick IMAGE.jpg -stroke black -strokewidth 1 -font Times-New-Roman -pointsize 72 -fill DarkViolet -annotate +650+50 'zaLinux.ru' -stroke black -strokewidth 2 -font Times-New-Roman -pointsize 72 -fill DarkViolet -annotate +650+150 'zaLinux.ru' -stroke black -strokewidth 3 -font Times-New-Roman -pointsize 72 -fill DarkViolet -annotate +650+250 'zaLinux.ru' -stroke black -strokewidth 4 -font Times-New-Roman -pointsize 72 -fill DarkViolet -annotate +650+350 'zaLinux.ru' -stroke black -strokewidth 5 -font Times-New-Roman -pointsize 72 -fill DarkViolet -annotate +650+450 'zaLinux.ru' -stroke black -strokewidth 6 -font Times-New-Roman -pointsize 72 -fill DarkViolet -annotate +650+550 'zaLinux.ru' test43.jpg
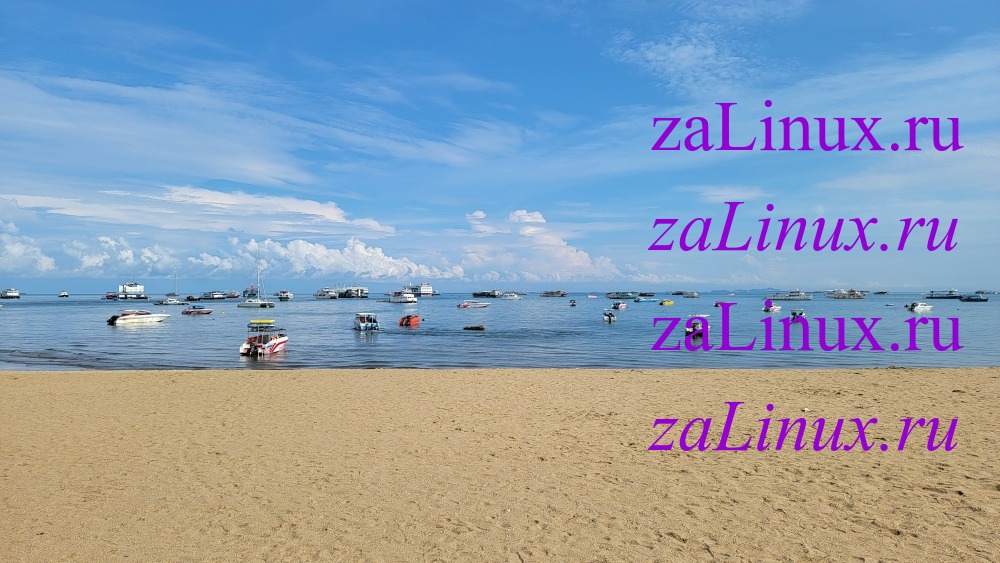
How to make a font italic or oblique
With the -style option, you can specify the font style, the following options are available:
- Any
- Italic
- Normal
- Oblique
You can display the full list of styles with the command:
magick -list style
Command result
magick IMAGE.jpg -style Any -family 'Times New Roman' -pointsize 72 -fill DarkViolet -annotate +650+150 'zaLinux.ru' -style Italic -family 'Times New Roman' -pointsize 72 -fill DarkViolet -annotate +650+250 'zaLinux.ru' -style Normal -family 'Times New Roman' -pointsize 72 -fill DarkViolet -annotate +650+350 'zaLinux.ru' -style Oblique -family 'Times New Roman' -pointsize 72 -fill DarkViolet -annotate +650+450 'zaLinux.ru' test44.jpg
How to change the text background color
To change the background, use the -undercolor COLOR option.
You can see the names of all colors in the How to specify color in ImageMagick section.
Command example:
magick IMAGE.jpg -undercolor Red -pointsize 72 -fill DarkViolet -font Liberation-Serif -annotate +650+150 'zaLinux.ru' test45.jpg
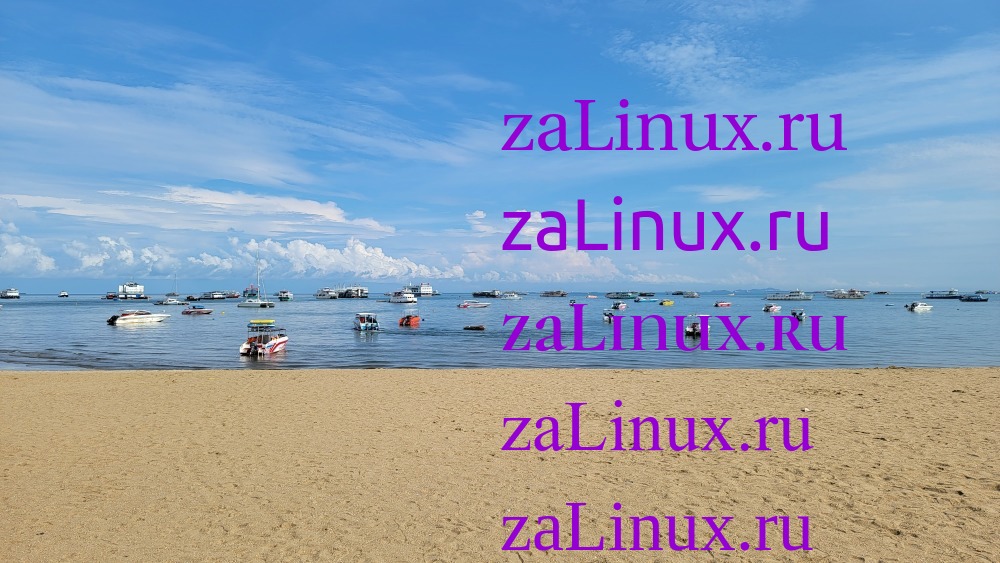
How to change the origin of coordinates
In the previous commands, the coordinates were counted from the upper left corner. With the -gravity TYPE option, you can choose a different area as the origin.
The following values are available as TYPE:
- None
- Center
- East
- Forget
- NorthEast
- North
- NorthWest
- SouthEast
- South
- SouthWest
- West
Result of command execution:
magick IMAGE.jpg -gravity None -pointsize 60 -fill DarkViolet -font Liberation-Serif -annotate +0+0 'None' -gravity Center -pointsize 60 -fill DarkViolet -font Liberation-Serif -annotate +0+0 'Center' -gravity East -pointsize 60 -fill DarkViolet -font Liberation-Serif -annotate +0+0 'East' -gravity Forget -pointsize 60 -fill DarkViolet -font Liberation-Serif -annotate +0+0 'Forget' -gravity NorthEast -pointsize 60 -fill DarkViolet -font Liberation-Serif -annotate +0+0 'NorthEast' -gravity North -pointsize 60 -fill DarkViolet -font Liberation-Serif -annotate +0+0 'North' -gravity NorthWest -pointsize 60 -fill DarkViolet -font Liberation-Serif -annotate +0+0 'NorthWest' -gravity SouthEast -pointsize 60 -fill DarkViolet -font Liberation-Serif -annotate +0+0 'SouthEast' -gravity South -pointsize 60 -fill DarkViolet -font Liberation-Serif -annotate +0+0 'South' -gravity SouthWest -pointsize 60 -fill DarkViolet -font Liberation-Serif -annotate +0+0 'SouthWest' -gravity West -pointsize 60 -fill DarkViolet -font Liberation-Serif -annotate +0+0 'West' test46.jpg

See also The -gravity option defines the origin for the Offset.
How to enable or disable anti-aliasing when adding labels
Using the -antialias and +antialias options, you can turn on/off the rendering of anti-aliasing pixels when drawing fonts and lines.
By default, objects (such as text, lines, polygons, etc.) are anti-aliased when drawn, so the -antialias option is used by default and does not need to be specifically specified.
Use +antialias to disable the addition of antialiasing edge pixels. This will reduce the number of colors added to the image to those that are directly drawn. That is, when drawing such objects, mixed colors are not added.
The following command has label antialiasing enabled (the -antialias option is implied by default and can be omitted):
magick IMAGE.jpg -antialias -pointsize 72 -fill DarkViolet -font Liberation-Serif -annotate +650+150 'zaLinux.ru' test47.png
This command disables caption smoothing (antialiasing):
magick IMAGE.jpg +antialias -pointsize 72 -fill DarkViolet -font Liberation-Serif -annotate +650+150 'zaLinux.ru' test48.png
In my tests, the +antialias option either does not work with the JPG format, or as a result of the format's lossy compression, anti-aliasing cancel is not noticeable.
The result of disabling anti-aliasing is clearly visible in a PNG photo. Differences are visible both without magnification and when the image is enlarged. Without magnification, the inscription seems unnaturally sharp. At high magnification, when anti-aliasing is turned off, you can see that there are no transition pixels.

When anti-aliasing is enabled, transitional pixels are visible, the colors of which differ both from the color of the inscription and from the background.

How to set font thickness
With the -weight option, you can specify the weight of the font that is trying to apply to the font family.
This option suggests the font weight that ImageMagick should try to apply to the selected font family. Use a positive integer or choose one of the following notations:
Thin			Same as fontWeight = 100.
ExtraLight		Same as fontWeight = 200.
Light			Same as fontWeight = 300.
Normal			Same as fontWeight = 400.
Medium			Same as fontWeight = 500.
DemiBold		Same as fontWeight = 600.
Bold			Same as fontWeight = 700.
ExtraBold		Same as fontWeight = 800.
Heavy			Same as fontWeight = 900.
You can view the full list of options for this option with the command:
magick -list weight
An example of the following command
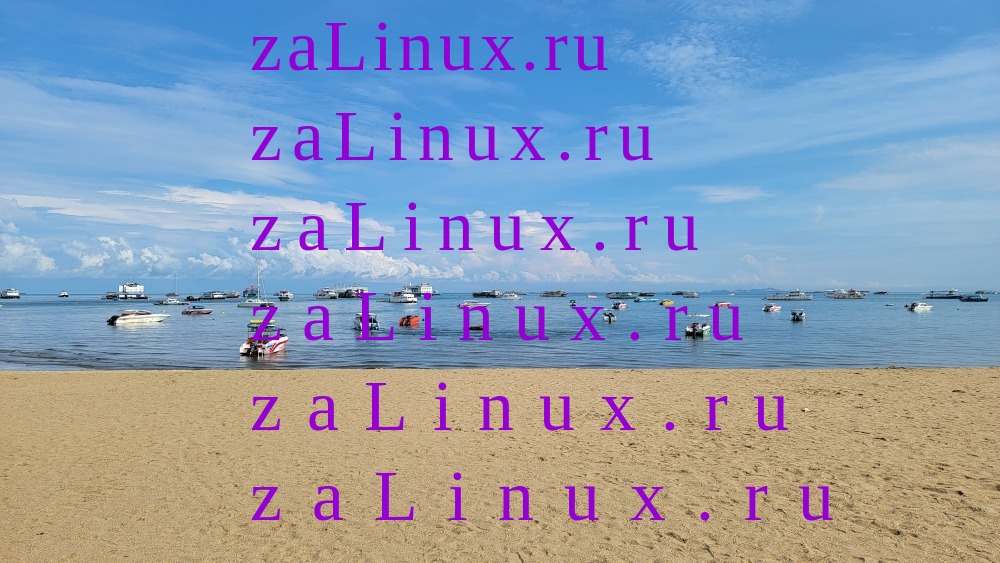
magick IMAGE.jpg -weight 100 -family 'Ubuntu' -pointsize 72 -fill DarkViolet -annotate +500+70 'zaLinux.ru' -weight 300 -family 'Ubuntu' -pointsize 72 -fill DarkViolet -annotate +500+170 'zaLinux.ru' -weight 500 -family 'Ubuntu' -pointsize 72 -fill DarkViolet -annotate +500+270 'zaLinux.ru' -weight 700 -family 'Ubuntu' -pointsize 72 -fill DarkViolet -annotate +500+370 'zaLinux.ru' -weight 900 -family 'Ubuntu' -pointsize 72 -fill DarkViolet -annotate +500+470 'zaLinux.ru' test49.jpg

As you can understand, depending on the specified “weight”, one of the font options (Light, Normal, Semi-Bold, Bold) is selected, which is most suitable. Keep in mind that not all fonts have versions, so for some fonts the result will be the same regardless of what is specified with the -weight option.
Also, if you specify a specific font using the -font option instead of the -family option, then regardless of the -weight value, the label will always look the same, because in the case of -family, a choice is made from several fonts, and in the case of -font, one font is always used.
How to change letter spacing
With the -kerning option, you can specify the spacing between two letters.
Command execution example
magick IMAGE.jpg -kerning 5 -pointsize 72 -fill DarkViolet -font Liberation-Serif -annotate +250+70 'zaLinux.ru' -kerning 10 -pointsize 72 -fill DarkViolet -font Liberation-Serif -annotate +250+160 'zaLinux.ru' -kerning 15 -pointsize 72 -fill DarkViolet -font Liberation-Serif -annotate +250+250 'zaLinux.ru' -kerning 20 -pointsize 72 -fill DarkViolet -font Liberation-Serif -annotate +250+340 'zaLinux.ru' -kerning 25 -pointsize 72 -fill DarkViolet -font Liberation-Serif -annotate +250+430 'zaLinux.ru' -kerning 30 -pointsize 72 -fill DarkViolet -font Liberation-Serif -annotate +250+520 'zaLinux.ru' test50.jpg
How to change word spacing
With the -interword-spacing option you can set the spacing between two words.
Command execution example:
magick IMAGE.jpg -interword-spacing 5 -pointsize 72 -fill DarkViolet -font Liberation-Serif -annotate +50+70 'zaLinux.ru and HackWare.ru' -interword-spacing 20 -pointsize 72 -fill DarkViolet -font Liberation-Serif -annotate +50+160 'zaLinux.ru and HackWare.ru' -interword-spacing 35 -pointsize 72 -fill DarkViolet -font Liberation-Serif -annotate +50+250 'zaLinux.ru and HackWare.ru' -interword-spacing 50 -pointsize 72 -fill DarkViolet -font Liberation-Serif -annotate +50+340 'zaLinux.ru and HackWare.ru' -interword-spacing 65 -pointsize 72 -fill DarkViolet -font Liberation-Serif -annotate +50+430 'zaLinux.ru and HackWare.ru' -interword-spacing 80 -pointsize 72 -fill DarkViolet -font Liberation-Serif -annotate +50+520 'zaLinux.ru and HackWare.ru' test51.jpg

The value specified as the distance can be either positive or negative.
How to change line spacing
With the -interline-spacing option you can set the spacing between two lines.
The value specified as the distance can be either positive or negative.
magick IMAGE.jpg -interline-spacing -30 -pointsize 72 -fill DarkViolet -font Liberation-Serif -annotate +50+70 'zaLinux.ru\nand\nHackWare.ru' -interline-spacing 50 -pointsize 72 -fill DarkViolet -font Liberation-Serif -annotate +550+270 'zaLinux.ru\nand\nHackWare.ru' test52.jpg

How to add rotated and slanted text to a photo
You can make text slanted with additional arguments to the -annotate option.
The option can be applied with the following set of arguments:
- -annotate DEGREES TEXT
- -annotate X_DEGREESxY_DEGREES TEXT
- -annotate X_DEGREESxY_DEGREES {+-}tx{+-}ty TEXT
- -annotate {+-}tx{+-}ty TEXT
In these lines:
- DEGREES – the angle of rotation of the entire text, without distortion
- X_DEGREES – shift angle of the right edge of the text relative to the left edge of the text
- Y_DEGREES – the angle of shift of the top edge of the text relative to the bottom edge of the text
- {+-}tx – horizontal offset in pixels from the center of gravity (by default, from the upper left corner)
- {+-}ty – vertical offset in pixels from the center of gravity (by default, from the upper left corner)
- TEXT – text to add to the image
All previous examples use only one syntax: -annotate {+-}tx{+-}ty TEXT
Command execution example:
magick IMAGE.jpg -pointsize 72 -fill DarkViolet -font Liberation-Serif -annotate 0x0+25+70 '1. zaLinux.ru' -pointsize 72 -fill DarkViolet -font Liberation-Serif -annotate 0x50+125+170 '2. zaLinux.ru' -pointsize 72 -fill DarkViolet -font Liberation-Serif -annotate 50x0+225+270 '3. zaLinux.ru' -pointsize 72 -fill DarkViolet -font Liberation-Serif -annotate 50x30+425+270 '4. zaLinux.ru' -pointsize 72 -fill DarkViolet -font Liberation-Serif -annotate 50x+625+270 '5. zaLinux.ru' test53.jpg
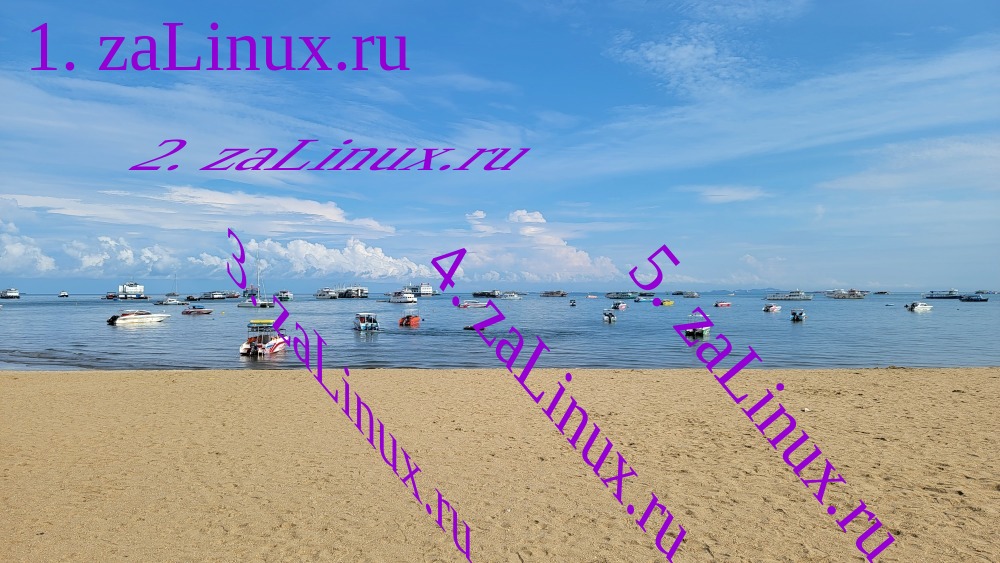
Please note that in order for the text to turn out to be rotated, but without distortion, the degrees must be the same.
How to insert multiline text
Multiline text can be inserted in a variety of ways. ImageMagick understands the “\n” character as a newline character:
magick IMAGE.jpg -pointsize 72 -fill DarkViolet -font Liberation-Serif -annotate +125+270 'zaLinux\n.\nru' test54.jpg
You can also tritely insert newline characters added to the image text:
magick IMAGE.jpg -pointsize 72 -fill DarkViolet -font Liberation-Serif -annotate +125+270 'zaLinux
.
ru' test54.jpg
You can also create a file with a multi-line record in advance. If you put the @ symbol before the filename, the program will try to find and read the given file. In the following command, the caption for the photo will be added from the mytext.txt file:
magick IMAGE.jpg -pointsize 72 -fill DarkViolet -font Liberation-Serif -annotate +125+270 @mytext.txt test54.jpg
To read standard input, use the @- construct.
Result of command execution:
magick IMAGE.jpg -pointsize 72 -fill DarkViolet -font Liberation-Serif -annotate +125+270 'zaLinux\n.\nru' -pointsize 72 -fill DarkViolet -font Liberation-Serif -annotate +425+270 'zaLinux
.
ru' -pointsize 72 -fill DarkViolet -font Liberation-Serif -annotate +725+270  @mytext.txt test54.jpg

How to use “label:” and “caption:” to add an image
Recall the essence of label: and caption:
- label: – image type intended for creating files representing labels or for adding labels to images
- caption: – another type of image that differs from “label:” in that instead of increasing the text size to the specified “-size” parameter, it wraps any long lines that do not fit into the specified “-size” width. That is, long text is broken into lines.
An example of creating an image with text:
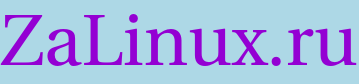
magick -background lightblue -fill DarkViolet -font Utopia-Regular -pointsize 72 label:ZaLinux.ru label.png
Instead of specifying the size with the “-pointsize” option, you can specify the size of the image (width and height, or just the width) with the “-size” option:
magick -background lightblue -fill DarkViolet -font Utopia-Regular -size 300 label:ZaLinux.ru label-size.png
You can use the “-pointsize” and “-size” options at the same time, but then the size of the text and image may not match.
Any of the options discussed above can be used to set font and label properties.
label: and caption: support multiline input.
If you want to add a caption to an image using “label:” or “caption:”, then use the options from the article “How to composite and append images on the Linux command line (overlay and merge images)”.
For example, the following command will create a caption and add it to an image:
magick IMAGE.jpg \( -background lightblue -fill DarkViolet -font Utopia-Regular -size 1000 label:ZaLinux.ru \) -append test60.jpg
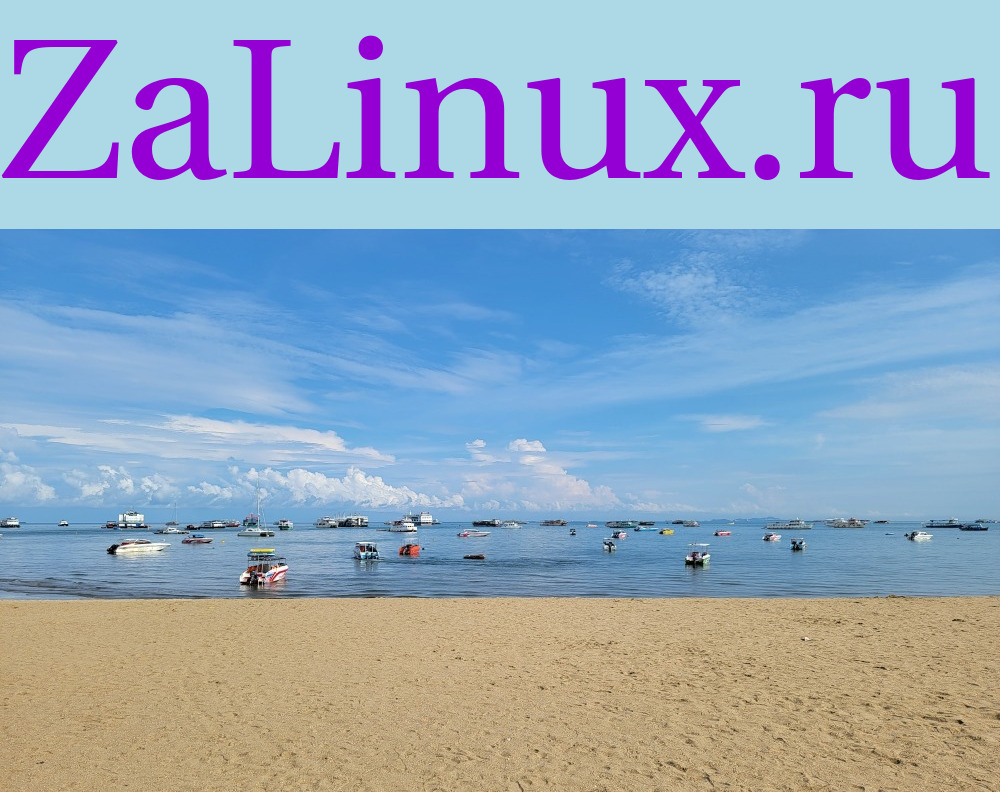
The following command is very similar to the previous one, with the difference that the first image is the caption, and then comes the photo, resulting in the caption being above the image:
magick \( -background lightblue -fill DarkViolet -font Utopia-Regular -size 1000 label:ZaLinux.ru \) IMAGE.jpg -append test61.jpg
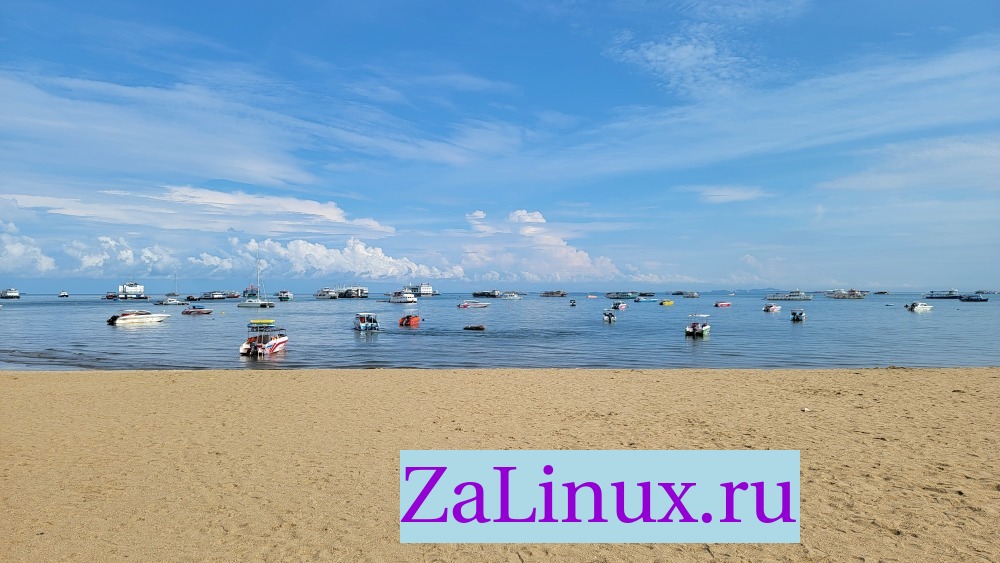
You can place an image with an inscription anywhere in the photo, to do this, specify the coordinates of the image using the -geometry option:
magick IMAGE.jpg \( -background lightblue -fill DarkViolet -font Utopia-Regular -size 400 label:ZaLinux.ru \) -geometry +400+450 -composite test62.jpg
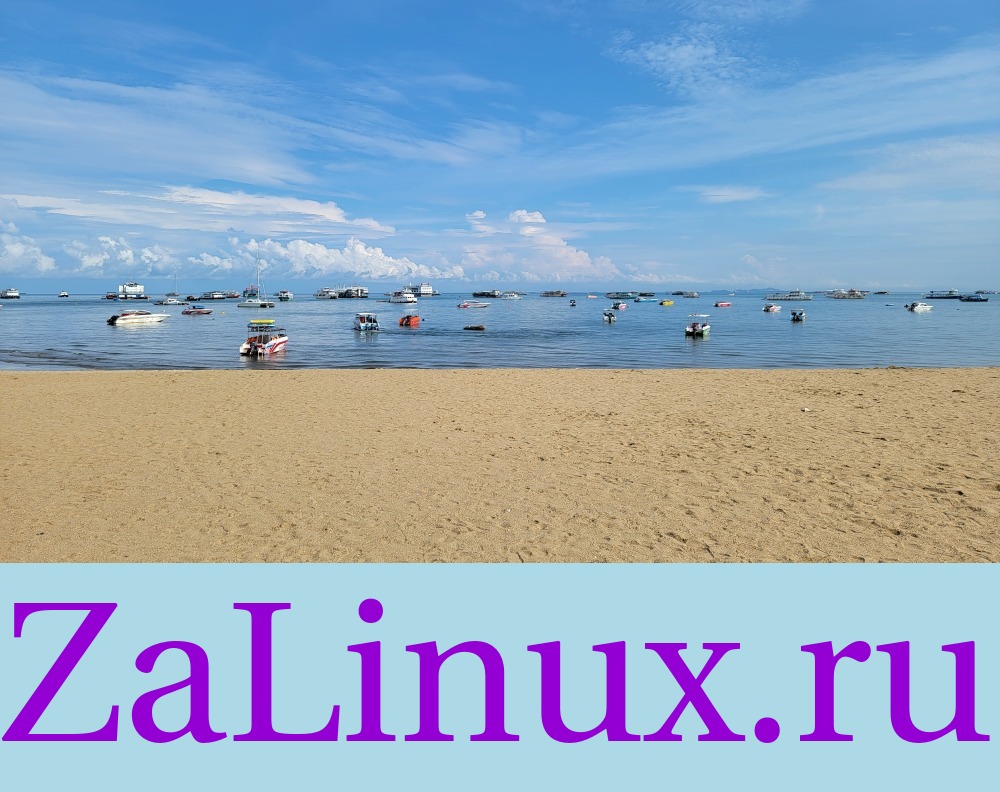
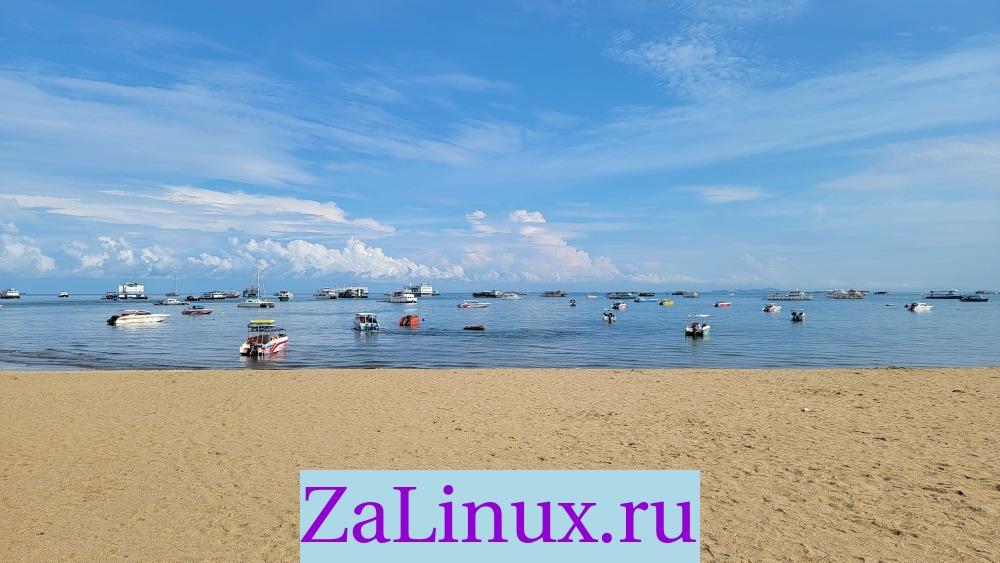
Using the -gravity option, you can place an inscription in one or another area of the image without specifying its coordinates, or change the origin of coordinates. The following command is to place the caption at the bottom of the photo:
magick IMAGE.jpg \( -background lightblue -fill DarkViolet -font Utopia-Regular -size 400 label:ZaLinux.ru \) -gravity South -geometry +0+0 -composite test63.jpg
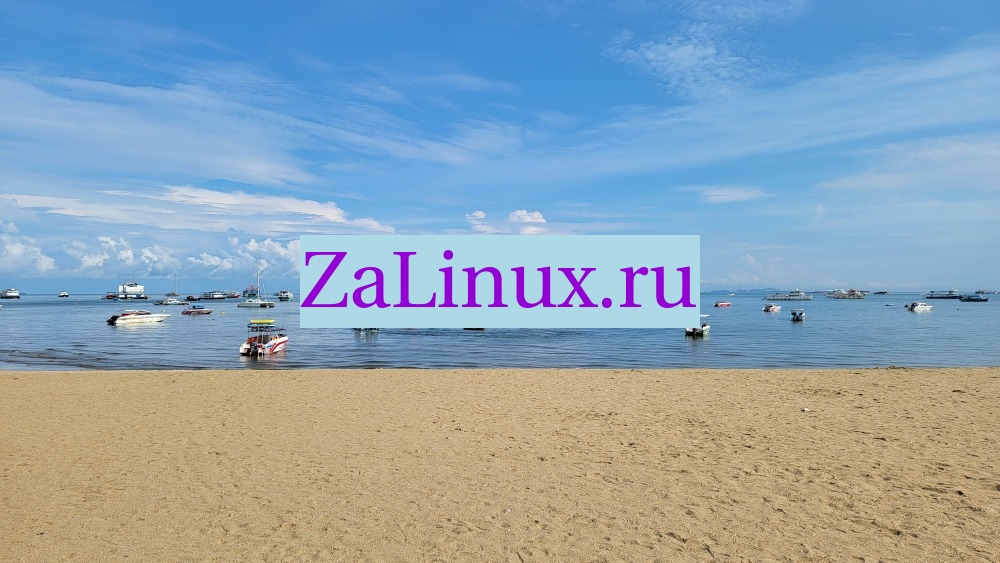
This command places the caption in the very center of the photo:
magick IMAGE.jpg \( -background lightblue -fill DarkViolet -font Utopia-Regular -size 400 label:ZaLinux.ru \) -gravity Center -geometry +0+0 -composite test64.jpg
How to use “label:” or “caption:” to add a caption without a background
To add a caption without a background using “label:” or “caption:” you need to use the following options:
- -transparent white – makes the background transparent
- +antialias – disables anti-aliasing, otherwise the inscription will turn out with white spots
Command example:
magick IMAGE.jpg \( -size 320x100 +antialias -fill blue label:'ZaLinux.ru' -transparent white \) -composite test.jpg
Another way to make the background completely transparent is to initially specify a color with full transparency. To learn how to do this, see How to specify a color with transparency.
Command example:
magick IMAGE.jpg \( -background 'rgba(255,255,255,0)' -fill DarkViolet -font Utopia-Regular -size 400 label:ZaLinux.ru \) -gravity South -geometry +0+0 -composite test65.jpg
How to add text with transparency to a photo. How to make a translucent background for the added image
You can use partially transparent colors for:
- adding text with transparency to a photo
- creating a transparent background for the added inscription
- to add a watermark to an image
In all cases, you can use the commands shown above, in order for the color to become transparent, just select the transparency level in the color properties. To learn how to do this, see How to specify a color with transparency.
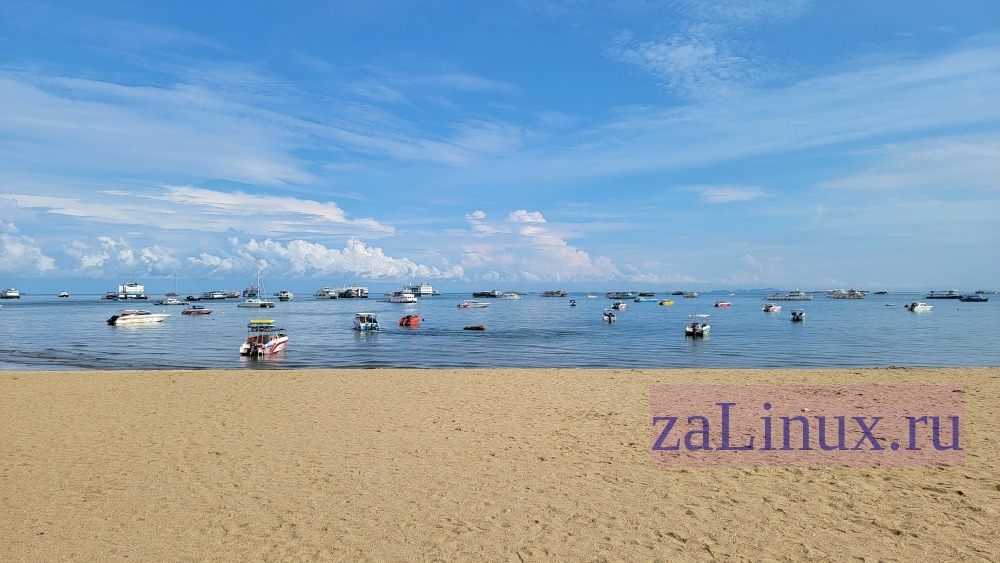
An example of a command using a partially transparent color:
magick IMAGE.jpg -pointsize 72 -fill 'rgba(148,0,211,0.5)' -annotate +650+150 'zaLinux.ru' test.jpg
The following command uses text with transparency for the caption and for the background of the text:
magick IMAGE.jpg -undercolor 'rgba(148,0,211,0.1)' -pointsize 72 -fill 'rgba(0,0,128,0.5)' -font Liberation-Serif -annotate +650+450 'zaLinux.ru' test66.jpg
You can also use transparent colors with “label:” or “caption:” (for both background and caption), like so:
magick IMAGE.jpg \( -background 'rgba(148,0,211,0.1)' -fill 'rgba(0,0,128,0.5)' -font Utopia-Regular -size 400 label:ZaLinux.ru \) -geometry +400+450 -composite test.jpg
See the continuation: How to add a caption to a large number of images.
Related articles:
- How to composite and append images on the Linux command line (overlay and merge images) (100%)
- How to add a caption to a large number of images (100%)
- How to modify images on the Linux command line (100%)
- ImageMagick guide: installing, using, and troubleshooting (94.3%)
- How to convert images to any formats in Linux (SOLVED) (94.3%)
- How to play a movie with an external audio track in VLC (RANDOM - 5.8%)