How to increase the size of the partition and file system after increasing the physical size of the disk
March 23, 2023
Disk partition size and file system size
In Linux, a disk can be used entirely by one partition or be divided into several partitions (similar to volumes in Windows).
Usually, at the stage of installing the operating system, disk partitioning is done: disk partitions are created, and then these partitions are formatted into one or another file system. In this case, the size of the file system corresponds to the size of the partition (or the entire disk, if there is only one partition). That is, the sizes of file systems are equal to the sizes of partitions.
But there may be situations when the size of the file system no longer matches the size of the partition on which it is located. Examples of such situations:
- you increased the disk size of your virtual private server (VPS)
- you replaced your computer's hard drive and transferred the root file system using the dd utility (or other utilities that support creating and writing clones of entire disks and partitions) to a new disk
In both cases described, the Linux operating system will only be able to use the size that the file system originally had.
For clarity, let's understand the terms:
Disk size – the entire size of a physical or virtual disk. It can be used by the operating system in whole or in part within the created partitions and file systems.
Partition size – the space that a particular partition occupies. When cloning partitions with dd to a disk of a larger partition, the layout of the previous disk is preserved. That is, the operating system can even use a new disk only within the limits of the old disk layout.
Filesystem size – similar to partition size, the OS can only use a partition up to the size of the filesystem, even if the filesystem is moved to a new disk of a larger partition.
If you still do not fully understand the difference between “partition size” and “file system size”, then you need to know that, from a practical point of view, when increasing the disk size, you need to run two commands:
- partition increase command
- file system increase command
Note: For some hosting providers, the file system size increases automatically after switching to a plan with a larger disk size. For example, with Digitalocean, it is enough to select a larger disk and wait for the changes to be applied. And with Ihor hosting, after increasing the size of the server disk (can be done only through the support service), you need to increase the size of the partitions and the file system yourself.
How to increase the partition size and file system size on the server
This article will show you how to increase the partition and file system size on a computer without a graphical user interface, without rebooting the computer, without unmounting the file system, and without having to boot into Live OS. That is, you can use the shown method on servers. But nothing prevents you from using the commands from this article also on your home computer, for example, when cloning the OS to a new disk.
In this article, I am expanding the ext4 file system. The described commands should definitely work for ext2/ext3/ext4 filesystems.
I'm following the steps on Arch Linux, but the commands shown should work for any OS. Only the file system type matters. That is, if you want to increase the size of ext2 / ext3 / ext4, then this instruction should work regardless of the Linux distribution.
Utilities for increasing the size of partitions and the file system.
We need the resize2fs utility. This utility is included in the e2fsprogs package and is most likely installed in your distribution by default, since it usually refers to core packages, that is, programs necessary for the normal functioning of the Linux OS.
We also need the growpart utility, which is included in the cloud-utils package.
- On Debian and Ubuntu derivatives, to install this package, run the commands:
sudo apt update
sudo apt install cloud-utils
- On Arch Linux and derivatives of this distribution, to install the cloud-utils package, run the command:
pacman -S cloud-utils
Backing up the partition table
Just in case something goes wrong, back up your drive's partition table:
sfdisk -d /dev/vdX > partition_bak.dmp
Save the partition_bak.dmp file to a safe location other than the drive you backed up the partition table, because if data loss occurs, this file will also become inaccessible.
How to check partition size and file system size
Let's look at the size of the file system with the following command
df -h
Sample output:
Filesystem      Size  Used Avail Use% Mounted on
dev             2.0G     0  2.0G   0% /dev
run             2.0G  552K  2.0G   1% /run
/dev/vda2        30G   28G     0 100% /
tmpfs           2.0G     0  2.0G   0% /dev/shm
tmpfs           2.0G   27M  1.9G   2% /tmp
/dev/vda1       193M  103M   80M  57% /boot
tmpfs           393M     0  393M   0% /run/user/0
From this output it follows that the size of the file system on the /dev/vda2 partition is 30G and there is no free space on it.
Let's see the sizes of disks and partitions:
fdisk -l
Sample output:
Disk /dev/vda: 35 GiB, 37580963840 bytes, 73400320 sectors
Units: sectors of 1 * 512 = 512 bytes
Sector size (logical/physical): 512 bytes / 512 bytes
I/O size (minimum/optimal): 512 bytes / 512 bytes
Disklabel type: dos
Disk identifier: 0x4b23ea92

Device     Boot  Start      End  Sectors  Size Id Type
/dev/vda1  *      2048   411647   409600  200M 83 Linux
/dev/vda2       411648 62914559 62502912 29.8G 83 Linux
It follows from these information that the size of the /dev/vda disk is 35 GB, and the size of the partitions present on it is 30 GB. The fact is that I hosting provider increased the size of the disk at my request. But the OS can still only use the old disk size.
How to increase the size of a Linux partition on the command line without Live System and unmounting the file system
To increase the partition to the maximum (taking into account free disk space), use the following command:
growpart /dev/DISK NUMBER
In this command:
- /dev/DISK – disk device name
- NUMBER – the number of the partition you want to enlarge
I want to enlarge the /dev/vda2 partition, so in my case:
- /dev/DISK is “/dev/vda”
- NUMBER is “2”
The command itself takes the following form:
growpart /dev/vda 2
But before executing it, it is recommended to run your command with the -N option. This option will cause the command to show what changes it will make, but the changes themselves will not be performed.
So let's run the command:
growpart -N /dev/vda 2
Sample output:
CHANGE: partition=2 start=411648 old: size=62502912 end=62914559 new: size=72988639 end=73400286
# === old sfdisk -d ===
label: dos
label-id: 0x4b23ea92
device: /dev/vda
unit: sectors
sector-size: 512

/dev/vda1 : start=        2048, size=      409600, type=83, bootable
/dev/vda2 : start=      411648, size=    62502912, type=83
# === new sfdisk -d ===
label: dos
label-id: 0x4b23ea92
device: /dev/vda
unit: sectors
sector-size: 512

/dev/vda1 : start=        2048, size=      409600, type=83, bootable
/dev/vda2 : start=      411648, size=    72988639, type=83
“# === old sfdisk -d ===” shows that the /dev/vda2 partition has 62502912 sectors (to get the disk size, multiply the number of sectors by the size of one sector, for example, 62502912*512/1024/1024/1024 = 29.80 GB).
“# === new sfdisk -d ===” shows the size of the /dev/vda2 partition after running the command. This size is 72988639 sectors (i.e. 72988639*512/1024/1024/1024 = 34.80 GB).
Since in my case the disk is 100% used, and the partition resizing operation is very serious, before actually moving on to the changes, I freed up some disk space. How to do this, see the articles:
If everything is correct, now we run a command that will actually resize the selected partition, increasing it to the maximum possible in accordance with the available free space on the disk (remember to substitute your disk value and partition number):
growpart /dev/vda 2
Sample output:
CHANGED: partition=2 start=411648 old: size=62502912 end=62914559 new: size=72988639 end=73400286
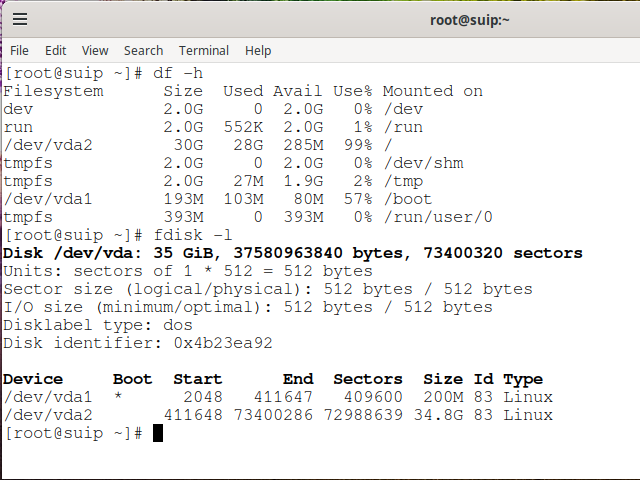
Check the partition and file system sizes:
df -h

fdisk -l
Pay attention to the line:
/dev/vda2 30G 28G 285M 99% /
The file system size is still around 30 gigabytes. Its usage dropped from 100% to 99% just because I freed up disk space.
Also note the following line:
/dev/vda2 411648 73400286 72988639 34.8G 83 Linux
That is, the size of the /dev/vda2 partition has really increased.
How to increase the size of a Linux filesystem on the command line without Live System and unmounting the filesystem
The command to increase the file system to the maximum size in accordance with the free space on the partition is as follows:
resize2fs /dev/DEVICE
In this command, /dev/DEVICE is the name of the disk device.
In my case, the name of the partition I want to enlarge is /dev/vda2, then the command is:
resize2fs /dev/vda2
Sample output:
resize2fs 1.47.0 (5-Feb-2023)
Filesystem at /dev/vda2 is mounted on /; on-line resizing required
old_desc_blocks = 2, new_desc_blocks = 3
The filesystem on /dev/vda2 is now 9123579 (4k) blocks long.
The output says that the filesystem on /dev/vda2 is mounted on / (the root filesystem), so “on-line resizing” is required. The command completed successfully.
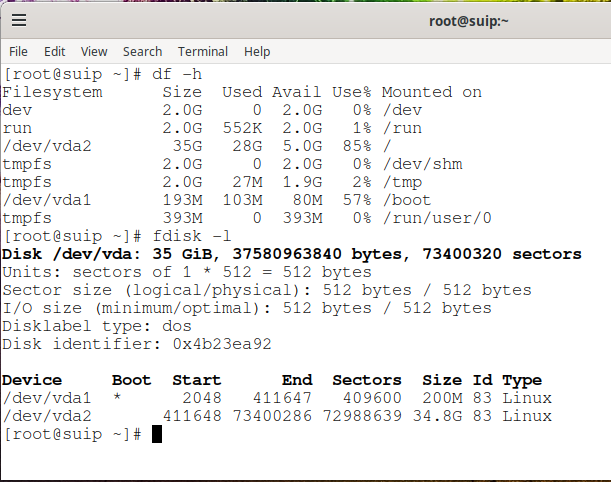
Check the partition and file system sizes:
df -h

fdisk -l
Pay attention to the line:
/dev/vda2 35G 28G 5.0G 85% /
The filesystem on /dev/vda2 is now 35G in size and only 28G is occupied. That is the file system is really increased.
Regarding the partition size we increased in the previous step
/dev/vda2 411648 73400286 72988639 34.8G 83 Linux
nothing has changed for it.
Related articles:
- File attributes on Linux (73.6%)
- How to find out when Linux was installed (64.7%)
- How to check if a computer is using BIOS or UEFI; GRUB or systemd-boot bootloader; MBR or GPT partition table (60.2%)
- How to check if my router supports IPv6 (59%)
- Error “Cannot load modules/libphp7.so” (SOLVED) (53.6%)
- How to download a package without installation in Arch Linux and Manjaro. How to download the AUR package source code (RANDOM - 50%)


