Tag: PowerShell

How to install the latest PowerShell on Windows 11

What's new in PowerShell 7

PowerShell 5.1 is installed by default in Windows 10 and Windows 11. In recent years, there has been an active development of new versions of PowerShell 7.*: 7.0, 7.1. PowerShell 7.2 beta is currently in development

You can view the PowerShell 6.* and PowerShell 7.* changelog on this page: https://github.com/PowerShell/PowerShell/tree/master/CHANGELOG

Despite the rapid development of the seventh version of PowerShell, the fifth version of PowerShell is still installed by default in the Windows operating system. Even the latest Windows 11 has PowerShell 5 installed.

PowerShell 7 is available for Windows, macOS, and Linux. We will show you how to install it on Windows 11.

Please note that PowerShell 7 is not currently a replacement for PowerShell 5, which means that when PowerShell 7 is installed, the fifth version will still be available on the system.

There are frequent updates for PowerShell 7, you can update to the latest versions of PowerShell 7 in the same ways that are shown in this article.

The latest version of PowerShell 7 can be downloaded in two ways - go to the releases page and find the PowerShell 7 installer; or use the script to download PowerShell 7 right in the command line.

Where to download PowerShell 7 (official site)

The first method we'll look at uses an .msi file to install PowerShell. MSI packages work almost identically to an EXE file and allow you to install a program using a graphical user interface. This is an installation method that only uses the required and key files. All you need to do is double click on the file to launch the installation wizard.

To download the package, launch your browser and go to the PowerShell Github Releases page. Scroll down to the Assets section and find the MSI file (PowerShell-*-win-x64.msi) there to download it.

Be sure to select the correct package for your version of Windows, x64 for 64-bit or x86 for 32-bit systems.

When prompted, select a download location and click Save to start downloading.

Once the download is complete, navigate to the folder where the file is located and double-click it to start the installation.

How to download PowerShell 7 from the command line

The PowerShell developers have also created a script that can be called directly from PowerShell. It is a one-line cmdlet that automatically downloads and runs the installation wizard. All you need to do is paste in the code snippet and hit the Enter key.

Start PowerShell and copy/paste the following cmdlet into the window:

iex "& { $(irm https://aka.ms/install-powershell.ps1) } -UseMSI"

Press Enter and PowerShell will run the command and start downloading.

If you are curious about what exactly the above command does, then the following notation may help you figure it out:

Invoke-Expression "& { $(Invoke-RestMethod https://aka.ms/install-powershell.ps1) } -UseMSI"

That is, at the first stage, the command downloads the file https://aka.ms/install-powershell.ps1 and then runs it.

PowerShell 7 Installer

When the installation wizard opens, click Next to install PowerShell 7.

On the next screen, select the folder where the PowerShell 7 files will be located and click Next:

Then you decide which additional features to include during installation. You can enable or disable the following five options:

  • Add PowerShell to Path Environment Variable: Adds PowerShell to the Windows Path environment variable and allows PowerShell to be invoked from any other shell or terminal.
  • Register Windows Event Logging Manifest: Adds PowerShell to the Windows Event Registration manifest and allows events to be logged from a PowerShell instance.
  • Enable PowerShell remoting: Enables the ability to remotely run commands on this system.
  • Add ‘Open here’ context menus to Explorer: Adds an option to the right-click context menu that opens a PowerShell instance in the folder you clicked.
  • Add ‘Run with PowerShell 7-preview’ context menus for PowerShell files: Adds an option to the right-click context menu that prompts PowerShell files to run a script using PowerShell 7.

Click “Next” after selecting all the additional features you want.

On this window, you can choose if you want PowerShell to be updated using Windows Update. You can still update PowerShell either manually or along with Windows updates.

Click “Next” after choosing the update options.

Click “Intall” to start installation. A UAC prompt will appear asking for administrator rights to install the package. Click “Yes” to continue.

When the installation wizard completes, click Finish to exit.

How to open PowerShell 7

Once the installation is complete, you can open PowerShell 7 in several ways.

If you selected the Add PowerShell to Path Environment Variable and Add ‘Open here’ Context Menus to Explorer options, you can enter

pwsh

or right-click any folder and select PowerShell 7 → Open here.

However, one of the easiest ways is to search for “pwsh”. Then press Enter or click on the PowerShell icon with the mouse. Here you can also run PowerShell 7 with Administrator rights.

To make sure you are using PowerShell 7, take a look at the window title:

To update the help, run the command:

Update-Help

If the previous command failed, then try updating the help like this:

Update-Help -UICulture en-US

How to make Terminal use PowerShell 7 by default

The default command line in Windows 11 is Terminal.

Terminal is a pretty and functional program, but even after installing PowerShell 7, it uses PowerShell 5 by default. This can be easily changed.

To do this, press Win+x and select “Windows Terminal”:

Click on the down arrow button to the right of the window names and select “Settings” from the menu:

In the drop-down menu “Default profile” select “PowerShell”, then click “Save”:

Terminal will now use the most recently installed version of Terminal by default.

If you want to switch to PowerShell 5, then enter at the command line:

powershell

Alternatively, select the appropriate option when opening a new tab:

How to shut down computers in PowerShell

Stop-Computer cmdlet

The Stop-Computer cmdlet shuts down the local or remote computer.

You can run Stop-Computer with additional options to specify authentication types and alternate credentials, and to force an immediate shutdown.

This cmdlet uses the Win32Shutdown method of the Win32_OperatingSystem WMI class.

The following two commands are identical and shutdown the local computer:

Stop-Computer
Stop-Computer -ComputerName localhost

The following example will shutdown a computer named Win-Server-Core that has an Administrator user with sufficient rights to shutdown the computer:

Stop-Computer -ComputerName Win-Server-Core -Credential Administrator

This command shuts down remote computers and the local computer.

Stop-Computer -ComputerName "Server01", "Server02", "localhost"

In the previous command, Stop-Computer uses the -ComputerName option to specify two remote computers and a local computer. Each of the listed computers will be turned off.

The following code shuts down remote computers as a background job:

$j = Stop-Computer -ComputerName "Server01", "Server02" &
$results = $j | Receive-Job
$results

In the previous example, Stop-Computer uses the -ComputerName option to specify two remote computers. The background operator “&” translates the command as a background job. The job objects are stored in the $j variable.

The job objects in the $j variable are piped to Receive-Job, which receives the job results. The objects are stored in the $results variable. The $results variable displays information about the job in the PowerShell console.

Shutting down the remote computer:

Stop-Computer -ComputerName "Server01" -WsmanAuthentication Kerberos

In the previous example, Stop-Computer uses the -ComputerName option to specify the remote computer. The -WsmanAuthentication option specifies using Kerberos to establish a remote connection.

Shutting down a computer in the domain:

$s = Get-Content -Path ./Domain01.txt
$c = Get-Credential -Credential Domain01\Admin01
Stop-Computer -ComputerName $s -Force -Credential $c

In the previous example, Get-Content uses the -Path option to read the contents of the Domain01.txt file in the current directory with a list of domain computers. The objects are stored in the $s variable.

Then Get-Credential uses the -Credential option to specify the credentials of the domain administrator. The credentials are stored in the $c variable.

Finally, Stop-Computer shuts down the computers specified in the list of computers in the -ComputerName option in the $s variable. The -Force option causes immediate shutdown. The -Credential option passes your credentials stored in the $c variable.

Error “Unable to initiate a system shutdown because the computer is being used by other users”

Running command

Stop-Computer -ComputerName Win-Server-Core -Credential Administrator

may fail with the error message:

Stop-Computer: Failed to stop the computer Win-Server-Core with the following error message: Unable to initiate a system shutdown because the computer is being used by other users

Its reason is that users are logged in to the computer and are using it.

To force shutdown, specify the -Force option:

Stop-Computer -ComputerName Win-Server-Core -Credential Administrator -Force

Shutting down the computer without PowerShell

Without PowerShell, you can shutdown your computer with the following command:

shutdown /s

You will be shown a warning and the computer will shut down after 30 seconds.

To shut down the computer immediately, run the command:

shutdown /s /t 0

You can add the /f option to the command, which means forcibly closing running applications without warning users. The /f parameter is implied if the /t parameter is set to a value greater than 0.

How to restart computers in PowerShell

Restart-Computer Cmdlet

The Restart-Computer cmdlet restarts the operating system on a local or remote computer.

The following command will reboot the local computer:

Restart-Computer

You can use Restart-Computer with various parameters to trigger restart operations, to specify authentication levels and alternate credentials, to restrict operations to be performed simultaneously, and to restart immediately.

Starting with Windows PowerShell 3.0, you can wait until the reboot is complete before running the next command. Specify the timeout and request interval and wait for certain services to be available on the rebooted computer. This feature makes it practical to use Restart-Computer in scripts and functions.

Restart-Computer only works on Windows computers and requires WinRM and WMI to shut down the system, including the local one.

Example of restarting multiple computers:

Restart-Computer -ComputerName Server01, Server02, localhost

The -ComputerName <String[]> option specifies a single computer name or an array of computer names separated by commas. Restart-Computer accepts ComputerName objects from a pipeline or variables.

Enter the NetBIOS name, IP address, or fully qualified domain name of the remote computer. To specify the local computer, enter the computer name, period “.” or “localhost”.

This parameter is independent of PowerShell remoting. You can use the -ComputerName parameter even if your computer is not configured to run remote commands.

If the -ComputerName parameter is not specified, Restart-Computer restarts the local computer.

If you are restarting a remote computer, you will most likely need the -Credential <PSCredential> option, which specifies a user account that has permission to perform this action. By default, this is the current user.

Enter a username, such as User01 or Domain01\User01, or enter the PSCredential object generated by the Get-Credential cmdlet. If you enter a username, you will be prompted for a password.

The credentials are stored in the PSCredential object (/dotnet/api/system.management.automation.pscredential) and the password is stored as SecureString (/dotnet/api/system.security.securestring).

The following example reboots computers whose names are obtained from a text file:

Get-Content -Path C:\Domain01.txt | Restart-Computer

Get-Content uses the -Path parameter to get a list of computer names from the Domain01.txt text file. Computer names are sent down the pipeline. Restart-Computer restarts every computer.

Forced restart of computers listed in the text file:

$Names = Get-Content -Path C:\Domain01.txt
$Creds = Get-Credential
Restart-Computer -ComputerName $Names -Credential $Creds -Force

Get-Content uses the -Path parameter to get a list of computer names from the Domain01.txt text file. Computer names are stored in the $Names variable. Get-Credential prompts you for a username and password and stores the values in the $Creds variable. Restart-Computer uses the -ComputerName and -Credential parameters with their variables. The -Force option causes each computer to restart immediately.

Restarting the remote computer and waiting for it to turn on to execute PowerShell:

Restart-Computer -ComputerName Server01 -Wait -For PowerShell -Timeout 300 -Delay 2

Restart-Computer uses the -ComputerName parameter to restart Server01. The -Wait parameter makes the command wait for the restart to complete. -For sets PowerShell to run commands on the remote computer. The -Timeout parameter sets a five minute wait. The -Delay parameter polls the remote computer every two seconds to determine if it has restarted.

Restarting your computer using WsmanAuthentication:

Restart-Computer -ComputerName Server01 -WsmanAuthentication Kerberos

Restart-Computer uses the -ComputerName parameter to restart the Server01 remote computer. The -WsmanAuthentication parameter specifies the Kerberos authentication method.

Error “Unable to initiate a system shutdown because the computer is being used by other users”

When restarting a remote computer, for example:

Restart-Computer -ComputerName Win-Server-Core -Credential Administrator

an error may occur

Restart-Computer: Failed to restart the computer Win-Server-Core with the following error message: System shutdown cannot be initiated because the computer is in use by other users.

This error occurs if any user is logged in to the remote computer, use the -Force option to force reboot:

Restart-Computer -ComputerName Win-Server-Core -Credential Administrator -Force

Restarting the computer without PowerShell

Without PowerShell, you can restart your computer with the following command:

shutdown /r

You will be shown a warning and the computer will restart after 30 seconds.

To restart your computer immediately, run the command:

shutdown /r /t 0

You can add the /f option to the command, which means forcibly closing running applications without warning users. The /f parameter is implied if the /t parameter is set to a value greater than 0.

How to configure the network interface to use a dynamic IP address (DHCP) in PowerShell

Note: all settings in this article must be done with administrator rights.

Dynamic Host Configuration Protocol (DHCP) allows the network adapter to obtain the correct network settings without manually configuring network interfaces.

To manage a network interface, you need to know its index. The list of interfaces and their indices can be obtained with the following command:

Get-NetIPAddress | Format-Table

Before activating DHCP on the network interface, you need to delete the IP address settings (if any).

Remove the static IP address:

Remove-NetIPAddress -InterfaceIndex INTERFACE_INDEX

Remove the default gateway:

Remove-NetRoute -InterfaceIndex INTERFACE_INDEX

For example:

Remove-NetIPAddress -InterfaceIndex 18
Remove-NetRoute -InterfaceIndex 18

Remove an IP address using a pipeline:

Get-NetIPAddress -IPAddress 192.168.0.1 | Remove-NetIPAddress

This command removes all of the IP addresses with the address 192.168.0.1.

To enable DHCP on the network interface, use a command of the form:

Set-NetIPInterface -InterfaceIndex INTERFACE_INDEX -Dhcp Enabled

For example:

Set-NetIPInterface -InterfaceIndex 18 -Dhcp Enabled

If you want to delete records about DNS servers so that DNS settings are also obtained automatically, then run the following command:

Set-DnsClientServerAddress -InterfaceIndex INTERFACE_INDEX -ResetServerAddresses

Please note that you can use DHCP and DNS server settings at the same time (specify the desired DNS servers for the network interface, which automatically receive an IP address and other network settings). To set the DNS server settings on the network interface with the specified index, use a command of the form:

Set-DnsClientServerAddress -InterfaceIndex INTERFACE_INDEX -ServerAddresses ("8.8.8.8","8.8.4.4")

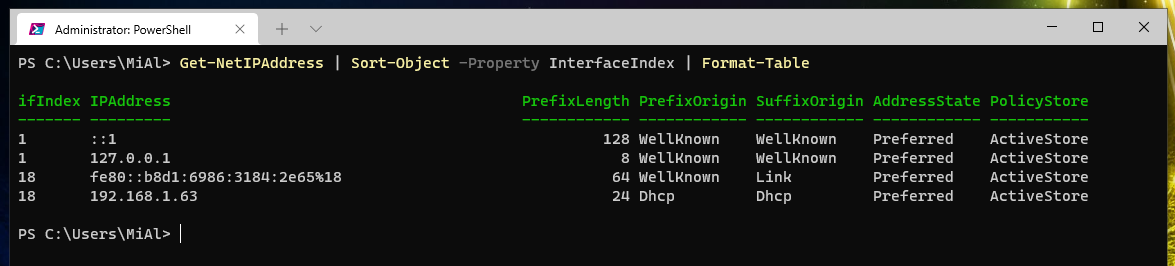
How to set IP address, netmask, default gateway and DNS for a network interface in PowerShell

Setting a static IP, netmask and gateway for a network adapter in PowerShell is a little confusing but possible. This post will show you how to do this using the New-NetIPAddress and Set-NetIPAddress cmdlets.

The old way of configuring network interfaces is using the netsh command. First, we look at the name of the network interfaces of any of the following commands (they are equivalent):

netsh interface show interface
netsh int show int

Then we set the parameters for the selected network interface (in the following commands this is the interface named “Wi-Fi”):

netsh interface ip set address "Wi-Fi" static <IP> <SUBNET> <GATEWATE>
netsh interface ip set dns "Wi-Fi" static <DNS SERVER>

But the netsh command is deprecated and Microsoft warns that they can remove netsh and we should use Powershell.

To manage a network adapter, we need to know its index, you can get it with the command:

Get-NetIPAddress

The Get-NetIPAddress cmdlet retrieves the IP address configuration such as IPv4 addresses, IPv6 addresses, and IP interfaces to which the addresses are associated.

You can use the following command to present information more conveniently:

Get-NetIPAddress | Format-Table

Additionally, you can sort by interface index number:

Get-NetIPAddress | Sort-Object -Property InterfaceIndex | Format-Table

Then, using the New-NetIPAddress cmdlet, you can set a static IP address:

New-NetIPAddress -InterfaceIndex NTERFACE_INDEX -IPAddress IP_ADDRESS -PrefixLength MASK -DefaultGateway GATEWAY

For example, the command to configure the network adapter with index 18 static IP address 192.168.1.71 with subnet mask /24 (255.255.255.0) and default gateway 192.168.1.1:

New-NetIPAddress -InterfaceIndex 18 -IPAddress 192.168.1.71 -PrefixLength 24 -DefaultGateway 192.168.1.1

This command will work fine if you want to switch from a dynamic IP address to a static one. But if you want to change the parameters of the network interface on which a static IP address is already set, then you will receive the following error:

New-NetIPAddress: Instance DefaultGateway already exists

To work around this, you can use Set-NetIPAddress, but this cmdlet does not accept the -DefaultGateway parameter, so a new address is assigned, but with the old gateway.

For example, the following command:

Set-NetIPAddress -InterfaceIndex 18 -IPAddress 192.168.1.71 -PrefixLength 24 -DefaultGateway 192.168.1.1

fails with the error:

Set-NetIPAddress: A parameter cannot be found that matches parameter name 'DefaultGateway'.

How do I remove the gateway to start with New-NetIPAddress, or replace the gateway when using Set-NetIPAddress?

It is necessary to use the following algorithm of actions.

Remove the static IP address:

Remove-NetIPAddress -InterfaceIndex INTERFACE_INDEX

Removing the default gateway:

Remove-NetRoute -InterfaceIndex INTERFACE_INDEX

Add a new IP address and gateway:

New-NetIPAddress -InterfaceIndex INTERFACE_INDEX -AddressFamily IPv4 10.1.2.4 -PrefixLength 24 -Type Unicast -DefaultGateway 10.1.2.255

To set the DNS server settings on the network interface with the specified index, use a command of the form:

Set-DnsClientServerAddress -InterfaceIndex INTERFACE_INDEX -ServerAddresses ("8.8.8.8","8.8.4.4")

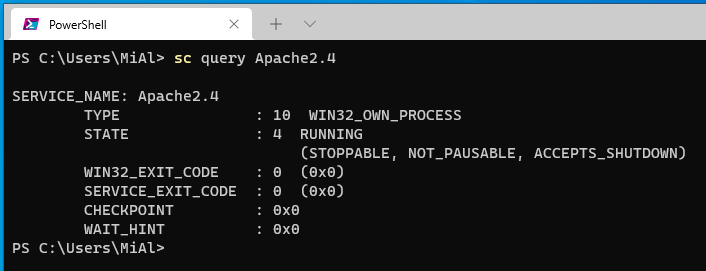
How to manage services on Windows

What are services

Services are a kind of programs that run in the background and do not require user input.

Services can either be specific to the Windows operating system or be third-party applications. Examples of services that the user can install himself: web server, VNC remote desktop server, SSH server, MySQL server.

You can manage services:

  • in the graphical interface
  • in command line
  • in PowerShell

Configuring services in the GUI

To open the service manager, search for “Services” and press Enter:

Another way to open this window is to press Win+r and enter:

services.msc

Here, in the Name column, you will see a list of the services running on your system, along with their Description. You will also be able to see their Status – whether they are running or stopped, as well as Startup Type and Log On As.

Windows service startup types

Windows 10 offers the following startup types:

  • Automatic
  • Automatic (Delayed Start)
  • Manual
  • Manual (Trigger Start)
  • Disabled

Start, stop, disable Windows services

To start, stop, pause, resume, or restart any Windows service, select the service and right-click it. You will be presented with these options.

If you want to manage additional options, double-click the Service to open its properties window.

Here, in the Startup Type drop-down menu, you will be able to select the startup type for the Service.

In the Service Status section, you will see the Start, Stop, Pause, Resume buttons.

In the Properties window, you will also see other tabs, such as Log On, Recovery, and Dependencies, which offer additional options and information.

After making the changes, you will need to click “Apply” button.

Managing Services Using the Command Line

You can also use command prompt to start, stop, pause, resume service. To use the console, open a Command Prompt or PowerShell with administrator rights and run one of the following commands.

To start the service:

net start SERVICE

For example, to start the mysql service:

net start mysql

To stop the service:

net stop SERVICE

For example, to stop the mysql service:

net stop mysql

To pause a service (not all services can be paused!):

net pause SERVICE

To resume the service:

net continue SERVICE

To disable autostart of a service:

sc config "SERVICE_NAME" start=disabled

For example, to disable subsequent starts of the mysql service:

sc config "mysql" start=disabled

To enable autostart of the service:

sc config "SERVICE_NAME" start=auto

For example, to enable autostart of the mysql service:

sc config "mysql" start=auto

Enumerating the states of active services and drivers

sc query

Enumerating Win32 Services Only

sc query type=service

To view the status of a specific service:

sc query SERVICE_NAME

For example, to see the status of an Apache2.4 service:

sc query Apache2.4

Managing Windows Services with PowerShell

PowerShell is Microsoft's task automation and configuration management framework. In this section, we will walk you through how to manage Windows services through PowerShell, as it is much faster and more efficient than other methods.

As you probably know, one of the most important parts of every operating system is the service that runs through it, and in general, it can be said that every part of the operating system that starts has a specific service that can be controlled and monitored.

Here's a comprehensive guide to using PowerShell to manage Windows services.

Launch PowerShell Terminal as Administrator. To do this, press Win+x and select Windows PowerShell (Admin):

First, you should get a list of available services using the following command:

Get-Service

This is the sample output you will receive.

In the default output, you will see 3 main sections: Status, Name and DisplayName. Now, if you want to find and list a specific service, you can filter out any of the parameters.

Examples

Show all services with names starting with wi:

Get-Service -Name wi*

Show all services whose display names start with win:

Get-Service -DisplayName win*

Note: if you want to access another computer over the network, you can view the list of services for that system using this command:

Get-Service -ComputerName SERVER1

An important part of service management is the management of dependent services.

To access the list of DependentServices for a specific service, we can use the following command:

Get-Service -Name SERVICE_NAME -DependentServices

For example:

Get-Service -Name WSearch -DependentServices

You can also use the RequiredServices parameter to get a list of service prerequisites.

Get-Service -Name SERVICE_NAME -RequiredServices

For example:

Get-Service -Name WSearch -RequiredServices

So with the commands above, we can find the name of the service you want, see the status and associated services or their dependencies. Now let's look at the commands for managing services.

To stop the service using PowerShell, you can use the following command:

Stop-Service -Name SERVICE_NAME

For example:

Stop-Service -Name Apache2.4

The following examples will be shown on the Apache2.4 service. That is, in the following commands, replace “Apache2.4” with the name of the service you are interested in.

To start a service in PowerShell, you can use this command:

Start-Service -Name Apache2.4

One of the most commonly used commands for working with services is the restart service command. The structure of the service restart command is as follows:

Restart-Service -Name Apache2.4

Finally, the following command is used to temporarily suspend a service.

Suspend-Service -Name Apache2.4

To change the startup mode of the service, use a command of the form:

Set-Service -Name SERVICE_NAME -StartupType START_TYPE

The START_TYPE can be:

  • Automatic – the service will be started or was started by the operating system at system startup. If an auto-start service depends on a manually-started service, the manually-started service also starts automatically at system startup.
  • AutomaticDelayedStart – Runs shortly after the system boots.
  • Disabled – the service is disabled and cannot be started by the user or application.
  • InvalidValue – Has no effect. The cmdlet does not return an error, but the StartupType of the service is not changed.
  • Manual – the service is started only manually, by the user, using the service control manager or application.

These are the most commonly used commands for managing services in PowerShell. For more information on PowerShell commands and how they work, use the Get-Help command.

For example:

Get-Help *-Service
Get-Help New-Service

How to install PowerShell on Arch Linux, Manjaro, BlackArch

PowerShell on Linux

PowerShell is a cross-platform automation and configuration tool/platform. PowerShell has a large number of system administration-oriented commands. But at the same time, PowerShell is a full-fledged programming language that allows you to write functional programs (scripts).

Note that PowerShell 5 is currently preinstalled on Windows by default, but this manual shows the installation of the latest version of PowerShell 7. On Windows, you can also install PowerShell 7.

Due to the differences between Windows and Linux operating systems, not all PowerShell functions work on Linux.

Installing PowerShell 7 on Arch Linux, Manjaro, BlackArch

It is recommended to install the pikaur utility according to the article “Automatic installation and update of AUR packages” and then just run the command:

pikaur -S powershell-bin

If you don't want to install pikaur, then run the following command sequence to install PowerShell:

git clone https://aur.archlinux.org/powershell-bin.git
cd powershell-bin
makepkg -si

How to run PowerShell on Arch Linux, Manjaro, BlackArch

To start an interactive PowerShell session, run the command:

pwsh

Linux PowerShell Examples

To list all PS commands on your computer, open PowerShell (pwsh command), and enter there:

Get-Command

It is possible to filter the information displayed by the Get-Command command. Let's say you want to see PowerShell commands containing the word “Alias”, for this you need to run the following command:

Get-Command -Name *Alias

To display help about a command (cmdlet) use the following:

Get-Help COMMANDLET

For example, to display help about the Get-Alias cmdlet:

Get-Help Get-Alias

To get the most complete help on Get-Command, do the following:

Get-Help Get-Command -Full

To display the contents of a folder (in this case the root of the file system), run:

Get-ChildItem /

To list processes run:

Get-Process

To stop the process with ID 10500 use the command as shown below:

Get-Process -Id 10500 | Stop-Process

See also “Linux PowerShell Basics (Beginner's Guide)”.

How to install PowerShell in Linux Mint

The PowerShell installation instructions often forget about Linux Mint, apparently, their authors believe that Linux Mint users do not need PowerShell. Let's fill that gap and take a look at how to install PowerShell in Linux Mint.

Linux Mint has several versions - “regular”, which, by the way, also differs in desktop environments (Cinnamon, MATE, Xfce) and LMDE (stands for Linux Mint Debian Edition).

How to install PowerShell in Linux Mint 20.1 (Cinnamon, MATE, Xfce)

Installing PowerShell in Linux Mint is the same regardless of the desktop environment (Cinnamon, MATE, Xfce).

Update the package list:

sudo apt update

Install the dependencies:

sudo apt install -y wget apt-transport-https software-properties-common

Download the GPG keys of the Microsoft repository:

wget -q https://packages.microsoft.com/config/ubuntu/20.04/packages-microsoft-prod.deb

Register the GPG keys for the Microsoft repository:

sudo dpkg -i packages-microsoft-prod.deb

Update the package list after adding packages.microsoft.com:

sudo apt update

Enable the “universe” repositories:

sudo add-apt-repository universe

Install PowerShell:

sudo apt install -y powershell

Start PowerShell:

pwsh

PowerShell will update automatically when all packages on the system are updated. You can separately launch the PowerShell update with the commands:

sudo apt update
sudo apt install powershell

If you want to remove PowerShell from Linux Mint, then run the command:

sudo apt remove powershell

How to install PowerShell in LMDE

Download the GPG keys of the Microsoft repository:

wget https://packages.microsoft.com/config/debian/10/packages-microsoft-prod.deb

Add the GPG keys for the Microsoft repository:

sudo dpkg -i packages-microsoft-prod.deb

Update the list of programs:

sudo apt update

Install PowerShell:

sudo apt install -y powershell

Starting PowerShell:

pwsh

PowerShell will update automatically when all packages on the system are updated. You can separately launch the PowerShell update with the commands:

sudo apt update
sudo apt install powershell

If you want to remove PowerShell from LMDE, then run the command:

sudo apt remove powershell

See also “Linux PowerShell Basics (Beginner's Guide)”.

Source

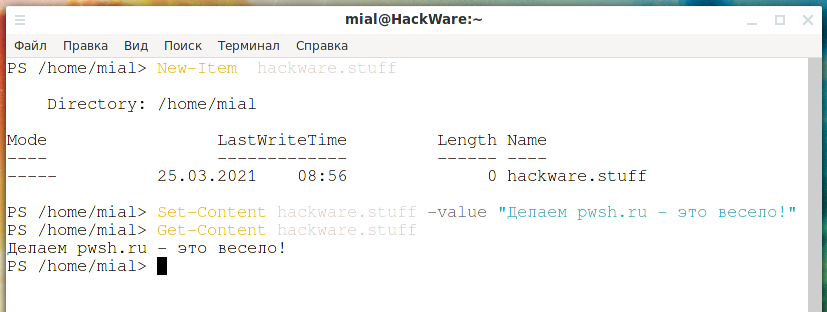
Linux PowerShell Basics (Beginner’s Guide)

PowerShell for Linux

In recent years, there has been a trend at Microsoft to cross-platform some of its products and open their source. Also Linux itself became part of Windows in the form of a subsystem. PowerShell, which was originally a Windows-only component, was released as open source and became cross-platform on August 18, 2016, available for Linux and Mac OS.

PowerShell is a task automation and configuration management system developed by Microsoft. It consists of a command interpreter (shell) and a scripting language built on the .NET Framework.

It offers full access to COM (Component Object Model) and WMI (Windows Management Instrumentation), thereby allowing system administrators to perform administrative tasks on both local and remote Windows systems, as well as WS-Management and CIM (Common Information Model), allowing you to administer remote Linux systems plus network devices.

Within this framework, administrative tasks are mostly performed by specific .NET classes called cmdlets (pronounced command-let). Similar to shell scripts in Linux, users can create scripts or executables by storing groups of cmdlets in files following specific rules. These scripts can be used as standalone utilities or command line tools.

How to install PowerShell on Linux

Installation on various Linux distributions is described in the official documentation “Installing PowerShell on Linux”.

But in the official documentation there is a lack of information about some distributions, to fill this gap, separate instructions were written:

Features of PowerShell on Linux

1. Command case is not important in PowerShell

In Windows, the case of commands and names of files and folders is not important – this is a big difference from Linux, where the case of both commands and files matters.

PowerShell inherits a feature from Windows – case is not important. Although this tutorial shows commands written in different case (for example, Get-Date), this is actually for better readability and it doesn't matter if you enter Get-Date, GET-DATE, get-date, or gET- dATE.

2. Some commands are missing

The set of commands in PowerShell depends on the available modules, that is, even on a Windows computer, if you install, for example, Active Directory, then new commands will appear in PowerShell.

The Linux version of PowerShell lacks some of the commands found in the standard Windows PowerShell, primarily when it comes to Windows-specific things.

3. Many aliases and abbreviations

You can see in the scripts and examples of PowerShell commands the unusual writing of commands – in PowerShell, abbreviated notation is allowed, and there are also many aliases, that is, the same action can be performed by commands written in different ways.

4. PowerShell versions

Please note that PowerShell 5 is currently preinstalled on Windows by default, and this shows the installation of the latest version of PowerShell 7. On Windows, you can also install PowerShell 7, but this version will not replace the preinstalled version – there will be 2 versions of PowerShell, moreover, when launched from the “Power user menu” (Win+x) will open PowerShell 5, and when you start Windows Terminal, PowerShell 7 will open.

5. Skipping option names

Some options are positional and when specifying their values, you can skip the option names – at first this may seem confusing.

How to use Powershell on Linux

In this section, we will have a short introduction to Powershell; where we will see how to start PowerShell, run some basic commands, see how to work with files, directories and processes. Later, you will learn how to list all available commands, show command help and aliases.

To start Powershell, enter:

pwsh

You can check the Powershell version with the following command:

$PSVersionTable

If you only need the version number, then use the following construction:

Get-Host | Select-Object Version

Running some basic Powershell commands on Linux.

Show current date:

Get-Date

Show computer uptime:

Get-Uptime

Show current working directory:

Get-Location

Working with files and directories in Powershell

1. Create a new empty file in two ways:

New-Item hackware.stuff

Or:

"">hackware.stuff

Then add content to it and view the content of the file.

Set-Content hackware.stuff -value "Делаем pwsh.ru - это весело!"
Get-Content hackware.stuff

2. Delete the file in PowerShell.

Remove-Item hackware.stuff
Get-Content hackware.stuff

3. Create a new directory.

Take a look at the following set of commands:

mkdir hackware-files
cd hackware-files
"">domains.list
ls

Sound familiar? Yes, as already mentioned, there are many aliases in PowerShell. The same actions can be performed with the following commands:

New-Item hackware-files -ItemType "directory"
Set-Location hackware-files
New-Item domains.list
Get-ChildItem -Name

In fact, the commands don't just do the same thing – they are identical.

4. To display a long list that displays detailed information about files and directories, including mode (file type), last modified time, enter:

dir

Or:

Get-ChildItem

To display the contents of a specific folder (in this case, the root of the file system), run:

Get-ChildItem /

Working with Processes in PowerShell

How to view all running processes in Linux using PowerShell:

Get-Process

To view detailed information about one or a group of running processes with a given name, specify the process name as an argument to the previous command as follows:

Get-Process httpd

The value of the units in the output is above:

  • NPM(K) – amount of non-paged memory that the process is using, in kilobytes.
  • PM(K) – amount of pageable memory that the process is using, in kilobytes.
  • WS(K) – size of the working set of the process, in kilobytes. The working set consists of the pages of memory that were recently referenced by the process.
  • CPU(s) – amount of processor time that the process has used on all processors, in seconds.
  • ID – process ID (PID).
  • ProcessName – name of the process.

To get all possible data about one or more processes use a command of the form (replace httpd with the name of the process you are interested in):

Get-Process httpd | Format-List *

To stop the process with ID 10500 use the command as shown below:

Get-Process -Id 10500 | Stop-Process

Getting Help in PowerShell

To learn more, get a list of all PowerShell commands for various tasks:

Get-Command

It is possible to filter the information displayed by the Get-Command command. Let's say you want to see PowerShell commands containing the word “Alias”, for this you need to run the following command:

Get-Command -Name *Alias

To display help about a command (cmdlet) use the following:

Get-Help CMDLETS

For example, to display help about the Get-Alias cmdlet:

Get-Help Get-Alias

To get the most complete help on Get-Command, do the following:

Get-Help Get-Command -Full

Aliases in PowerShell

To see all available command aliases, enter:

Get-Alias

To get information about a specific alias, enter its name:

Get-Alias -Name pwd

PowerShell Command History

Last but not least, display the command history (a list of the commands you ran earlier) like this:

history

So this was an introduction to PowerShell on Linux. Of course, PowerShell can actually do much more than create files and show running processes.

How to display all environment variables at the Windows command prompt

This article will show you how to display all environment variables from the Windows command line.

PowerShell and CMD

First of all, you need to distinguish what kind of program you are working in. The first appeared CMD - Windows command line, shell. For many years, CMD was the only option for running on the Windows command line.

Then PowerShell came along. In the beginning, it was an environment that could be specially launched. In recent years, PowerShell has become more common, in the “Power User Menu”, which is invoked by the Win+x keyboard shortcut, PowerShell has replaced CMD. Also, the new Terminal uses PowerShell by default.

The commands for displaying all environment variables depend on whether you are in PowerShell or CMD, so you need to differentiate between them.

PowerShell looks like this:

Or like this:

That is, the command line prompt begins with “PS”.

And the CMD looks like this:

Or like this:

How to list all environment variables in PowerShell

In PowerShell, use one of the following commands:

gci env:
ls env:
dir env:

They are not only equivalent, in fact, they are just aliases for the same command. That is, there is no difference in their use.

How to display all environment variables in CMD

To display environment variables in CMD use the command:

SET

To cut the output in one screen with the ability to scroll through the list, use the following construction:

SET | more

To save the output to a file:

SET > output.txt

This text file, output.txt, can be opened in any editor such as Notepad.

To display the value of a specific variable, use the familiar set command with the variable name:

set VARIABLE

For instance:

set PATH

The set command prints the value of all variables that start with the line VARIABLE. For example, the previous command will print the values of the PATH and PATHEXT variables.

And the following command will print the values of all variables whose name begins with P:

set P

Note that command names on Windows are not case sensitive.

Loading...
X