
How to set up Varnish, rule examples
February 21, 2021
Table of contents
1. How to change Varnish options
2. How to change cache retention time in Varnish
3. How to prevent Varnish from creating new cache for different browsers
4. A 403 page got into the Varnish cache and now it is shown to all users
5. How to make Apache logs show real IP address instead of 127.0.0.1 when used with Varnish
6. How to delete cookies that prevent caching
7. How to exclude certain pages from caching
8. How to exclude the home page from caching
9. How to increase the size of the Varnish cache
10. How to increase connection timeout in Varnish
11. How to exclude a specific site from Varnish caching
12. How to cache only a specific domain in Varnish
13. How to redirect HTTP to HTTPS in Varnish
14. How to delete cookies from all hosts except pages of a specific host
15. How to remove cookies from all pages except specific URLs
16. Adding and Removing HTTP Headers
Once you've installed and configured Varnish to work with your web server. It would seem that everything is working fine and now you can move on to other things. But the truth is, with the default settings, Varnish is (almost) completely useless. The point is that by default:
- cache storage time 2 minutes
- a NEW cache is created for EACH User Agent. That is, if a page was requested by a user with a Chrome browser of one version, and then a user came with a different version of Chrome or with a different browser, then a new page will be created for him, instead of showing the one saved in the cache.
That is, the cache stores data for 2 minutes, which with a probability of 99% will not be shown to anyone for these two minutes, and then the data is deleted.
Moreover, with the default settings, Varnish is even harmful: a page with a response code of 503 (error on the server) or 403 (access denied) may be cached and this page will show everyone even when the problem is fixed.
In general, even though many tutorials on the Internet end up after installing Varnish and setting up a web server, you need to continue and do everything right. This is what this article is about. Here we will cover the minimum required configuration of Varnish to be useful and not harmful, and will also list examples of Varnish configuration that you can use in various situations.
How to change Varnish options
You can configure Varnish in the /etc/varnish/default.vcl configuration file, as well as by editing the command line launch options:
systemctl edit --full varnish
We will use both methods.
For the changes made in the default.vcl file to take effect, you must run the command:
systemctl reload varnish
This command will reload the configuration but keep the cache.
To make the changes made to the start command take effect, you must run:
systemctl restart varnish
This command will not save the cache - it will be cleared.
How to change cache retention time in Varnish
By default, Varnish keeps the cache for only 2 minutes - it is not enough for many situations.
The issue of storing the cache in Varnish is quite complex and can be devoted to a separate article. Here's a look at the basics.
First, there are three periods that Varnish keeps data in its cache:
- TTL - Time To Live. This is the lifetime of the data. This is the period in which the data is stored in the cache and is considered fresh. “Fresh” - this means that when a request is received to show the page, the contents of the cache will be returned.
- Grace. Grace period. This period comes after TTL. The data is still stored in the cache, and when a request is received for it, data from the cache is returned, at the same time a data update is started - a request is made to the web server.
- Keep. Storage period. This is the period after TTL and Grace. The data is still stored in the cache, but is served to the user under certain conditions.
All these periods can be customized:
- in the config file
- in the command line
- via HTTP headers
We will use the configuration file /etc/varnish/default.vcl. Open it:
vim /etc/varnish/default.vcl
The settings need to be made in the vcl_backend_response section. There are three options available, corresponding to each period
- beresp.ttl
- beresp.grace
- beresp.keep
Example:
sub vcl_backend_response {

	# First we set the TTL value for most of the content that needs to be cached
	set beresp.ttl = 10m;
	set beresp.grace = 2h;

	# Now we can set specific TTLs based on the content to be cached
	# For VoD, we set a medium-long TTL and a long grace period, since VoD
	# content is not prone to change. This allows us to use this cache
	# for the most requested content

	if (beresp.url ~ "/vod") {
		set beresp.ttl = 30m;
		set beresp.grace = 24h;
	}

	# For live content we use a very low TTL and an even smaller grace period
	# since the live content is no longer *live* once it has been consumed

	if (beresp.url ~ "/url") {
		set beresp.ttl = 10s;
		set beresp.grace = 2s;
	}

	# We are increasing the *keep* duration for IMS

	if (bereq.http.If-Modified-Since) {
		set beresp.keep = 10m;
	}
}
As you can see from the example, suffixes are used:
- ms - milliseconds
- s - seconds
- m - minutes
- h - hours
- d - days
- w - weeks
- y - years
Additional Information:
- https://varnish-cache.org/docs/trunk/users-guide/vcl-grace.html?highlight=beresp%20grace
- https://varnish-cache.org/docs/trunk/users-guide/vcl-built-in-subs.html?highlight=beresp%20grace#beresp-ttl-beresp-grace-beresp-keep
- https://docs.varnish-software.com/tutorials/object-lifetime/
How to prevent Varnish from creating new cache for different browsers
If the web server sends the HTTP header
Vary: User-Agent
Varnish then creates new pages for each browser version. That is, different cache entries will be created for Chrome 85 and Chrome 86! Apache sends this HTTP header by default.
Let's demonstrate this.
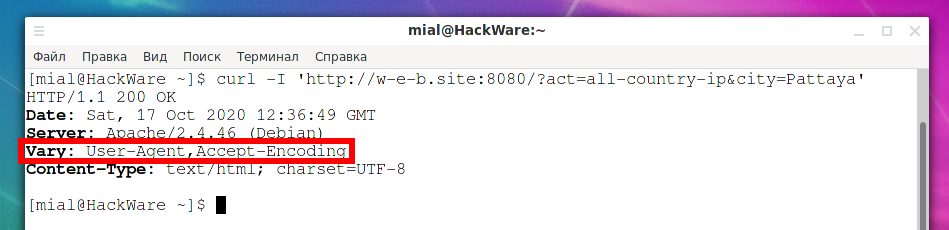
First, let's make a request to the website using port 8080 (that is, bypassing the cache, we connect directly to Apache):
curl -I 'http://w-e-b.site:8080/?act=all-country-ip&city=Pattaya'
Pay attention to the line:
Vary: User-Agent,Accept-Encoding
There may be other options, for example:
Vary: User-Agent

Now we will run the command twice
time curl -s 'https://w-e-b.site/?act=all-country-ip&city=Pattaya' -A 'Chrome' > /dev/null
In it, we measure the time and can make sure that the second time the cache is created, the time it takes to get the page is much shorter. We also specified Chrome as the User Agent.
But if you change the User Agent value, then you can see from the time spent that the cache is being re-created:
time curl -s 'https://w-e-b.site/?act=all-country-ip&city=Pattaya' -A 'Firefox' > /dev/null
This behavior of the caching system usually doesn't make sense. Therefore, you need to make it so that Varnish uses the same cache for all User Agents.
There are several ways to do this. The easiest is to change the web server settings so that it does not send the “Vary: User-Agent” HTTP header.
The following shows how to change Apache settings so that it doesn't send “Vary: User-Agent”.
On Debian and derivatives:
a2enmod headers
Then add the line to the configuration file /etc/apache2/apache2.conf:
Header set Vary "Accept-Encoding"
Reboot the server:
systemctl restart apache2
On Arch Linux and derivatives:
Make sure to uncomment the following line in /etc/httpd/conf/httpd.conf:
LoadModule headers_module modules/mod_headers.so
Then add the line to the same file (/etc/httpd/conf/httpd.conf):
Header set Vary "Accept-Encoding"
Reboot the server for the changes to take effect:
systemctl restart httpd.service
We have rewritten the Vary HTTP header to only have Accept-Encoding.
This setup is definitely worth the effort! Varnish will now have one cache for all web browsers.
Additional Information:
A 403 page got into the Varnish cache and now it is shown to all users
It may happen that a user who is prohibited from viewing the site (banned by IP or by User Agent) opened a page and it got into the cache. As a result, now all users will be shown a message that access is denied instead of the normal page.
To fix this, add the following setting:
sub vcl_backend_response {
	if (beresp.status == 403 || beresp.status == 404 || beresp.status >= 500)
	{
		set beresp.ttl = 3s;
	}
}
How to make Apache logs show real IP address instead of 127.0.0.1 when used with Varnish
Since Apache is now receiving requests from Varnish, now the web server logs always show 127.0.0.1 as client IP addresses.
This can be fixed as follows:
- We tell Varnish to add the X-Forwarded-For HTTP header containing the user's real IP address when sending requests to the Apache server.
- And in Apache, we enable the mod_remoteip module and specify in the settings to use the IP address from the X-Forwarded-For HTTP header as the user's real IP address
That is, you need to configure both Varnish and Apache. But the setup is very useful and well worth it!
Let's start by configuring Varnish, add to its config file:
sub vcl_recv {
    if (req.restarts == 0) {
        if (req.http.X-Forwarded-For) {
           set req.http.X-Forwarded-For = req.http.X-Forwarded-For + ", " + client.ip;
       } else {
        set req.http.X-Forwarded-For = client.ip;
       }
    }
}
The web server settings differ slightly depending on the distribution.
On Debian and derivatives:
a2enmod remoteip
Then add the line to the configuration file /etc/apache2/apache2.conf:
RemoteIPHeader x-forwarded-for
Reboot the web server:
systemctl restart apache2
On Arch Linux and derivatives:
Make sure to uncomment the following line in /etc/httpd/conf/httpd.conf:
LoadModule remoteip_module modules/mod_remoteip.so
Then add the line to the same file:
RemoteIPHeader x-forwarded-for
Reboot the server for the changes to take effect:
systemctl restart httpd.service
Additional Information:
Some tutorials advise you to modify the Apache log format - this will also work if done correctly, but it will take longer.
How to delete cookies that prevent caching
Requests that send cookies are not cached. If you have ad units or metrics (counters) on your site, then we can say that Varnish does not cache anything. Moreover, in the case of cookies for ad networks and counters, this is also absolutely useless data for the server.
To remove all cookies and allow data to be cached add:
sub vcl_recv {
	unset req.http.Cookie;
}
This setting will disrupt sites that rely on cookies. For example, if you have a WordPress site with registration for users, then cookies are required to identify users. In such cases, it is better to use another solution, such as Memcached.
How to exclude certain pages from caching
To exclude from caching all paths containing the string “/path/for/exclude/” anywhere in the URL:
sub vcl_recv {
	if (req.url ~ "^/path/for/exclude/") {
		return (pass);
	}
}
Note that the ~ (tilde) character means that the search is performed using a regular expression. And the ^ (caret) character means the beginning of a line.
If you want to exclude URLs in which “/path/for/exclude/” appears in any part of the URL, then remove the ^ character, for example:
sub vcl_recv {
	if (req.url ~ "/path/for/exclude/") {
		return (pass);
	}
}
If you want the search to be performed not by a regular expression, but by an exact match, then replace ~ with ==, for example:
sub vcl_recv {
	if (req.url == "/path/for/exclude/") {
		return (pass);
	}
}
You can use the if () {} construct several times or combine them into one. Symbol || means logical “OR”:
sub vcl_recv {
	if (req.url ~ "myip" || req.url ~ "proxy-checker" || req.url ~ "my-user-agent") {
		return (pass);
	}
}
That is, the previous setting will exclude from caching all pages with the string “myip” or the string “proxy-checker” or the string “my-user-agent” anywhere in the URL.
An example in which, for the host suip.biz, pages containing the string “/ru” in the URL are excluded from the cache:
sub vcl_recv {
	if (req.http.host == "suip.biz" && req.url == "/ru") {
		return (pass);
	}
}
How to exclude the home page from caching
The following example excludes the home page from the cache for the host suip.biz:
sub vcl_recv {
	if (req.http.host == "suip.biz" && req.url == "/") {
		return (pass);
	}
}
How to increase the size of the Varnish cache
The cache size settings must be changed in the command launch line, for this:
systemctl edit --full varnish
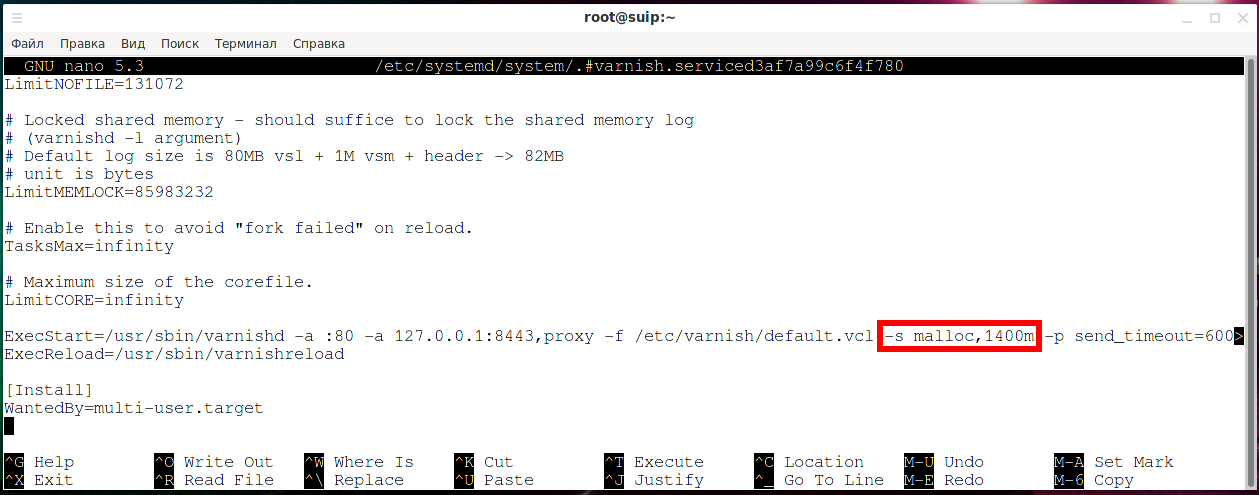
To resize the in-memory cache, edit the -s option. By the way, malloc means that the cache is stored in RAM. You can specify to store it in a file - if you need it, then refer to the documentation.
Specify the desired cache size, for example -s malloc,1400m.
Restart the varnish service for the changes to take effect:
systemctl restart varnish
How to increase connection timeout in Varnish
If the sending of data from Varnish to the client is not complete within 60 seconds, the connection is dropped. For regular sites this is fine, but for video portals or long-term services it may not be enough.
Varnish has quite a few timeout parameters, you can view their value with the command:
varnishadm param.show | grep timeout
Output example:
backend_idle_timeout          60.000 [seconds] (default)
between_bytes_timeout         60.000 [seconds] (default)
cli_timeout                   60.000 [seconds] (default)
connect_timeout               3.500 [seconds] (default)
first_byte_timeout            60.000 [seconds] (default)
idle_send_timeout             60.000 [seconds] (default)
pipe_timeout                  60.000 [seconds] (default)
send_timeout                  60.000 [seconds] (default)
thread_pool_timeout           300.000 [seconds] (default)
timeout_idle                  5.000 [seconds] (default)
timeout_linger                0.050 [seconds] (default)
The parameter we need, which is responsible for the maximum time for sending data during one connection, is called send_timeout.
To change it, you need to edit the command line
systemctl edit --full varnish
Add an option to the command like this:
-p send_timeout=SECONDS
For example, to set a connection timeout for 10 minutes:
-p send_timeout=600
Please note that you cannot specify the “s” suffix or any other, otherwise the program will not start. You only need to specify a number that means seconds for the connection timeout.
With this setting, we changed the value of the maximum time for sending data. But there is another timeout that sets the maximum connection duration. To edit it, open the /etc/varnish/default.vcl file and add the settings there:
backend default {
	.connect_timeout = 600s;
	.first_byte_timeout = 600s;
	.between_bytes_timeout = 600s;
}
In order not to edit the service start options, I tried to add the send_timeout option to the config file, but in this case, the service does not start due to an error. If you know what the matter is and how to do without adding an option in the command line, then write in the comments.
Restart the varnish service for the changes to take effect:
systemctl restart varnish
Additional Information:
How to exclude a specific site from Varnish caching
Exception from hashing softocracy.ru:
sub vcl_recv {
   if (req.http.host ~ "(www\.)?softocracy\.ru") {
     return(pass);
   }
}
If you do not want any site to be cached, then exclude it from caching entirely. In the example above, change softocracy.ru to the site's domain, which should not be cached.
How to cache only a specific domain in Varnish
For all other domains, pass must be returned:
sub vcl_recv {
	# if it's any domain other than example.com, then skip caching
	if (! req.http.host ~ "(www\.)?example\.com") {
		return (pass);
	}
	# otherwise switch to default behavior
}
pass tells Varnish not to look into its cache, it will always receive content from the destination web server.
How to redirect HTTP to HTTPS in Varnish
If you use Varnish, it is no longer possible to redirect to HTTPS using the web server methods, since Apache no longer works with HTTPS connections and does not even listen on port 443.
The following example will show you how to configure Varnish to redirect all requests to suip.biz from HTTP to HTTPS.
import std;

sub vcl_recv {
	# We ask Varnish to give 750 status for HTTP requests from external IP to port 80,
	# but not with SSL Termination Proxy (Hitch).
	if ((client.ip != "127.0.0.1" && std.port(server.ip) == 80) && (req.http.host ~ "^(?i)(www\.)?suip.biz")) {
		set req.http.x-redir = "https://" + req.http.host + req.url;
		return (synth(750, ""));
	}
}


sub vcl_synth {
	# Listen to 750 status from vcl_recv.
	if (resp.status == 750) {
		// Redirect to HTTPS with a 301 status.
		set resp.status = 301;
		set resp.http.Location = req.http.x-redir;
		return(deliver);
	}
}
In the previous configuration example, replace the “suip.biz” domain with your own.
How to delete cookies from all hosts except pages of a specific host
If you want cookies to be deleted for pages of all hosts, except for the pages of a specific host, then use the setting like this:
sub vcl_recv {
	if (! req.http.host ~ "(www\.)?HERE\.DOMAIN") {
		unset req.http.Cookie;
	}
}
Instead of “HERE\.DOMAIN” enter the domain on which you do not need to delete cookies. Note the escaping of the point.
An example of a setting that deletes cookies from all domains, except for the pages of the domains wxmaxima.ru and softocracy.ru:
sub vcl_recv {
	if (! req.http.host ~ "(www\.)?wxmaxima\.ru" && ! req.http.host ~ "(www\.)?softocracy\.ru") {
		unset req.http.Cookie;
	}
}
Attention:
1. Restart the varnish service for the changes to take effect:
systemctl restart varnish
2. In the config file use “unset req.http.Cookie;” only once! If you use it two or more times, the behavior will not be what you expect. Group all the conditions you need using logical AND and OR before using “unset req.http.Cookie;” only.
How to remove cookies from all pages except specific URLs
If you want to exclude only certain pages from deleting cookies, then use the setting like this:
sub vcl_recv {
	if (! req.url ~ "^/PATH/FOR/EXCLUDE/") {
		unset req.http.Cookie;
	}
}
An example of a setting that deletes cookies from all domains, except for the pages of the wxmaxima.ru domains and pages on any domains whose URL contains the string “phpmyadmin”:
sub vcl_recv {
	if (! req.http.host ~ "(www\.)?wxmaxima\.ru" && ! req.url ~ "^/phpmyadmin") {
		unset req.http.Cookie;
	}
}
Attention:
1. Restart the varnish service for the changes to take effect:
systemctl restart varnish
2. In the config file use “unset req.http.Cookie;” only once! If you use it two or more times, the behavior will not be what you expect. Group all the conditions you need using logical AND and OR before using “unset req.http.Cookie;” only.
Adding and Removing HTTP Headers
Varnish Cache gives you the ability to modify, add, and remove HTTP headers for the request and response object.
Request headers
The vcl_recv subroutine is called at the beginning of the request, and this is where we will change the request headers. We will add a hello header with the value world and remove the user agent header.
sub vcl_recv {
	...

	set req.http.hello = "world";
	unset req.http.user-agent;

	...
}
The req.http object is for accessing any request header and is readable only from vcl_recv and vcl_deliver.
Response headers
vcl_backend_response is called when Varnish Cache receives response headers from the upstream service. We will change the header cache control and set it to “public, max-age=600”, and remove the server header.
sub vcl_backend_response {
	...

	set beresp.http.cache-control = "public, max-age=600";
	unset beresp.http.server;

	...
}
The beresp.http object is for accessing any response header and is readable only from vcl_backend_response and vcl_deliver.
Additional documentation:
- https://varnish-cache.org/docs/trunk/reference/vcl.html
- https://varnish-cache.org/docs/trunk/index.html
- https://www.varnish-software.com/wiki/content/tutorials/varnish/sample_vclTemplate.html
- https://github.com/mattiasgeniar/varnish-4.0-configuration-templates/blob/master/default.vcl
- https://docs.varnish-software.com/tutorials/
- https://docs.varnish-software.com/tutorials/vsl-query/
Related articles:
- Error “Cannot load modules/libphp7.so” (SOLVED) (100%)
- How to install a web server (Apache, PHP, MySQL, phpMyAdmin) on Linux Mint, Ubuntu and Debian (100%)
- How to show all errors in PHP 8 (100%)
- phpMyAdmin error “Error: Undefined constant "SODIUM_CRYPTO_SECRETBOX_KEYBYTES"” (SOLVED) (100%)
- Error “No such file or directory: AH02454: FCGI: attempt to connect to Unix domain socket /run/php/php8.1-fpm.sock (*:80) failed” (SOLVED) (100%)
- Official 7-Zip for Linux has been released (RANDOM - 50%)