
How to connect a TV to a computer in Linux in Xfce (Kali Linux, Xubuntu)
June 25, 2022
Is it possible to connect a TV or a second monitor to a computer in Linux
This post will show you how to connect a TV or a second monitor to a Linux computer with the Xfce desktop environment. It will also talk about the available settings and solutions to typical problems that arise when connecting a TV to a computer.
Xfce is used in distributions such as Kali Linux and Xubuntu, and the Xfce desktop environment can be installed on any other distribution.
If you have a different desktop environment, then see the articles:
- How to connect a TV to a computer in Linux in Cinnamon (Linux Mint, LMDE)
- How to connect a TV to a computer in Linux in GNOME (Ubuntu)
If you are a Windows user, then see the article “How to connect a TV to a computer in Windows 11”.
What you need to connect a TV or an additional monitor to a computer
To connect a TV or a second monitor to a computer or laptop, you need:
- TV with HDMI connector (all modern models) or monitor with HDMI connector (all monitors released in the last two decades)
- a computer with an HDMI connector – almost all computers and laptops will fit
- HDMI cable
Choosing an HDMI cable
I approached the choice of HDMI cable quite simply – I chose the cheapest with the right length, which I found in the store. In subsequent use, this cable fully satisfied my needs.

Despite its cheapness, this HDMI cable supports:
- UHD 4K@2160P / 4K@60Hz / 4K HDR
- High Speed HDMI 2.0
- Gold plated contacts

Cable length 1.8 meters.
Apparently, these are already the minimum characteristics – perhaps more expensive models support higher resolutions and data transfer at higher speeds.
What TV can be connected to a computer
Using an HDMI cable, you can connect any TV with an HDMI connector. This connector is present on all TVs and monitors released in the last decade.
Older TVs without an HDMI connector can also be connected to a computer, but instead of an HDMI cable, you will need a wire with an adapter.
As for the technical characteristics of the TV (diagonal size, screen resolution, screen refresh rate, aspect ratio), this is not critical. That is, you do not have to select a TV model with the same characteristics as your monitor. Modern video cards support a variety of modes (screen resolutions and refresh rates), including the video card will work with a TV if the screen resolution is different from the monitor.
For example, the characteristics of my devices:
- laptop monitor: 17", 1920×1080, 16:9, 120 Hz
- TV (all specifications): 32", 1366x768p, 16:10, 60Hz
That is, these are two very different devices, but at the same time I had no problems when they worked together.
How to connect HDMI cable to TV
Plug the HDMI cable into the connectors of the computer (laptop) and TV.
Both on the computer and on the TV, there may be several HDMI connectors – remember the number of the selected connector.
Turn on your computer and TV.
Note: The HDMI cable can be connected when the computer and TV are already on.
Use the remote control to select “HDMI” as the input source on the TV.
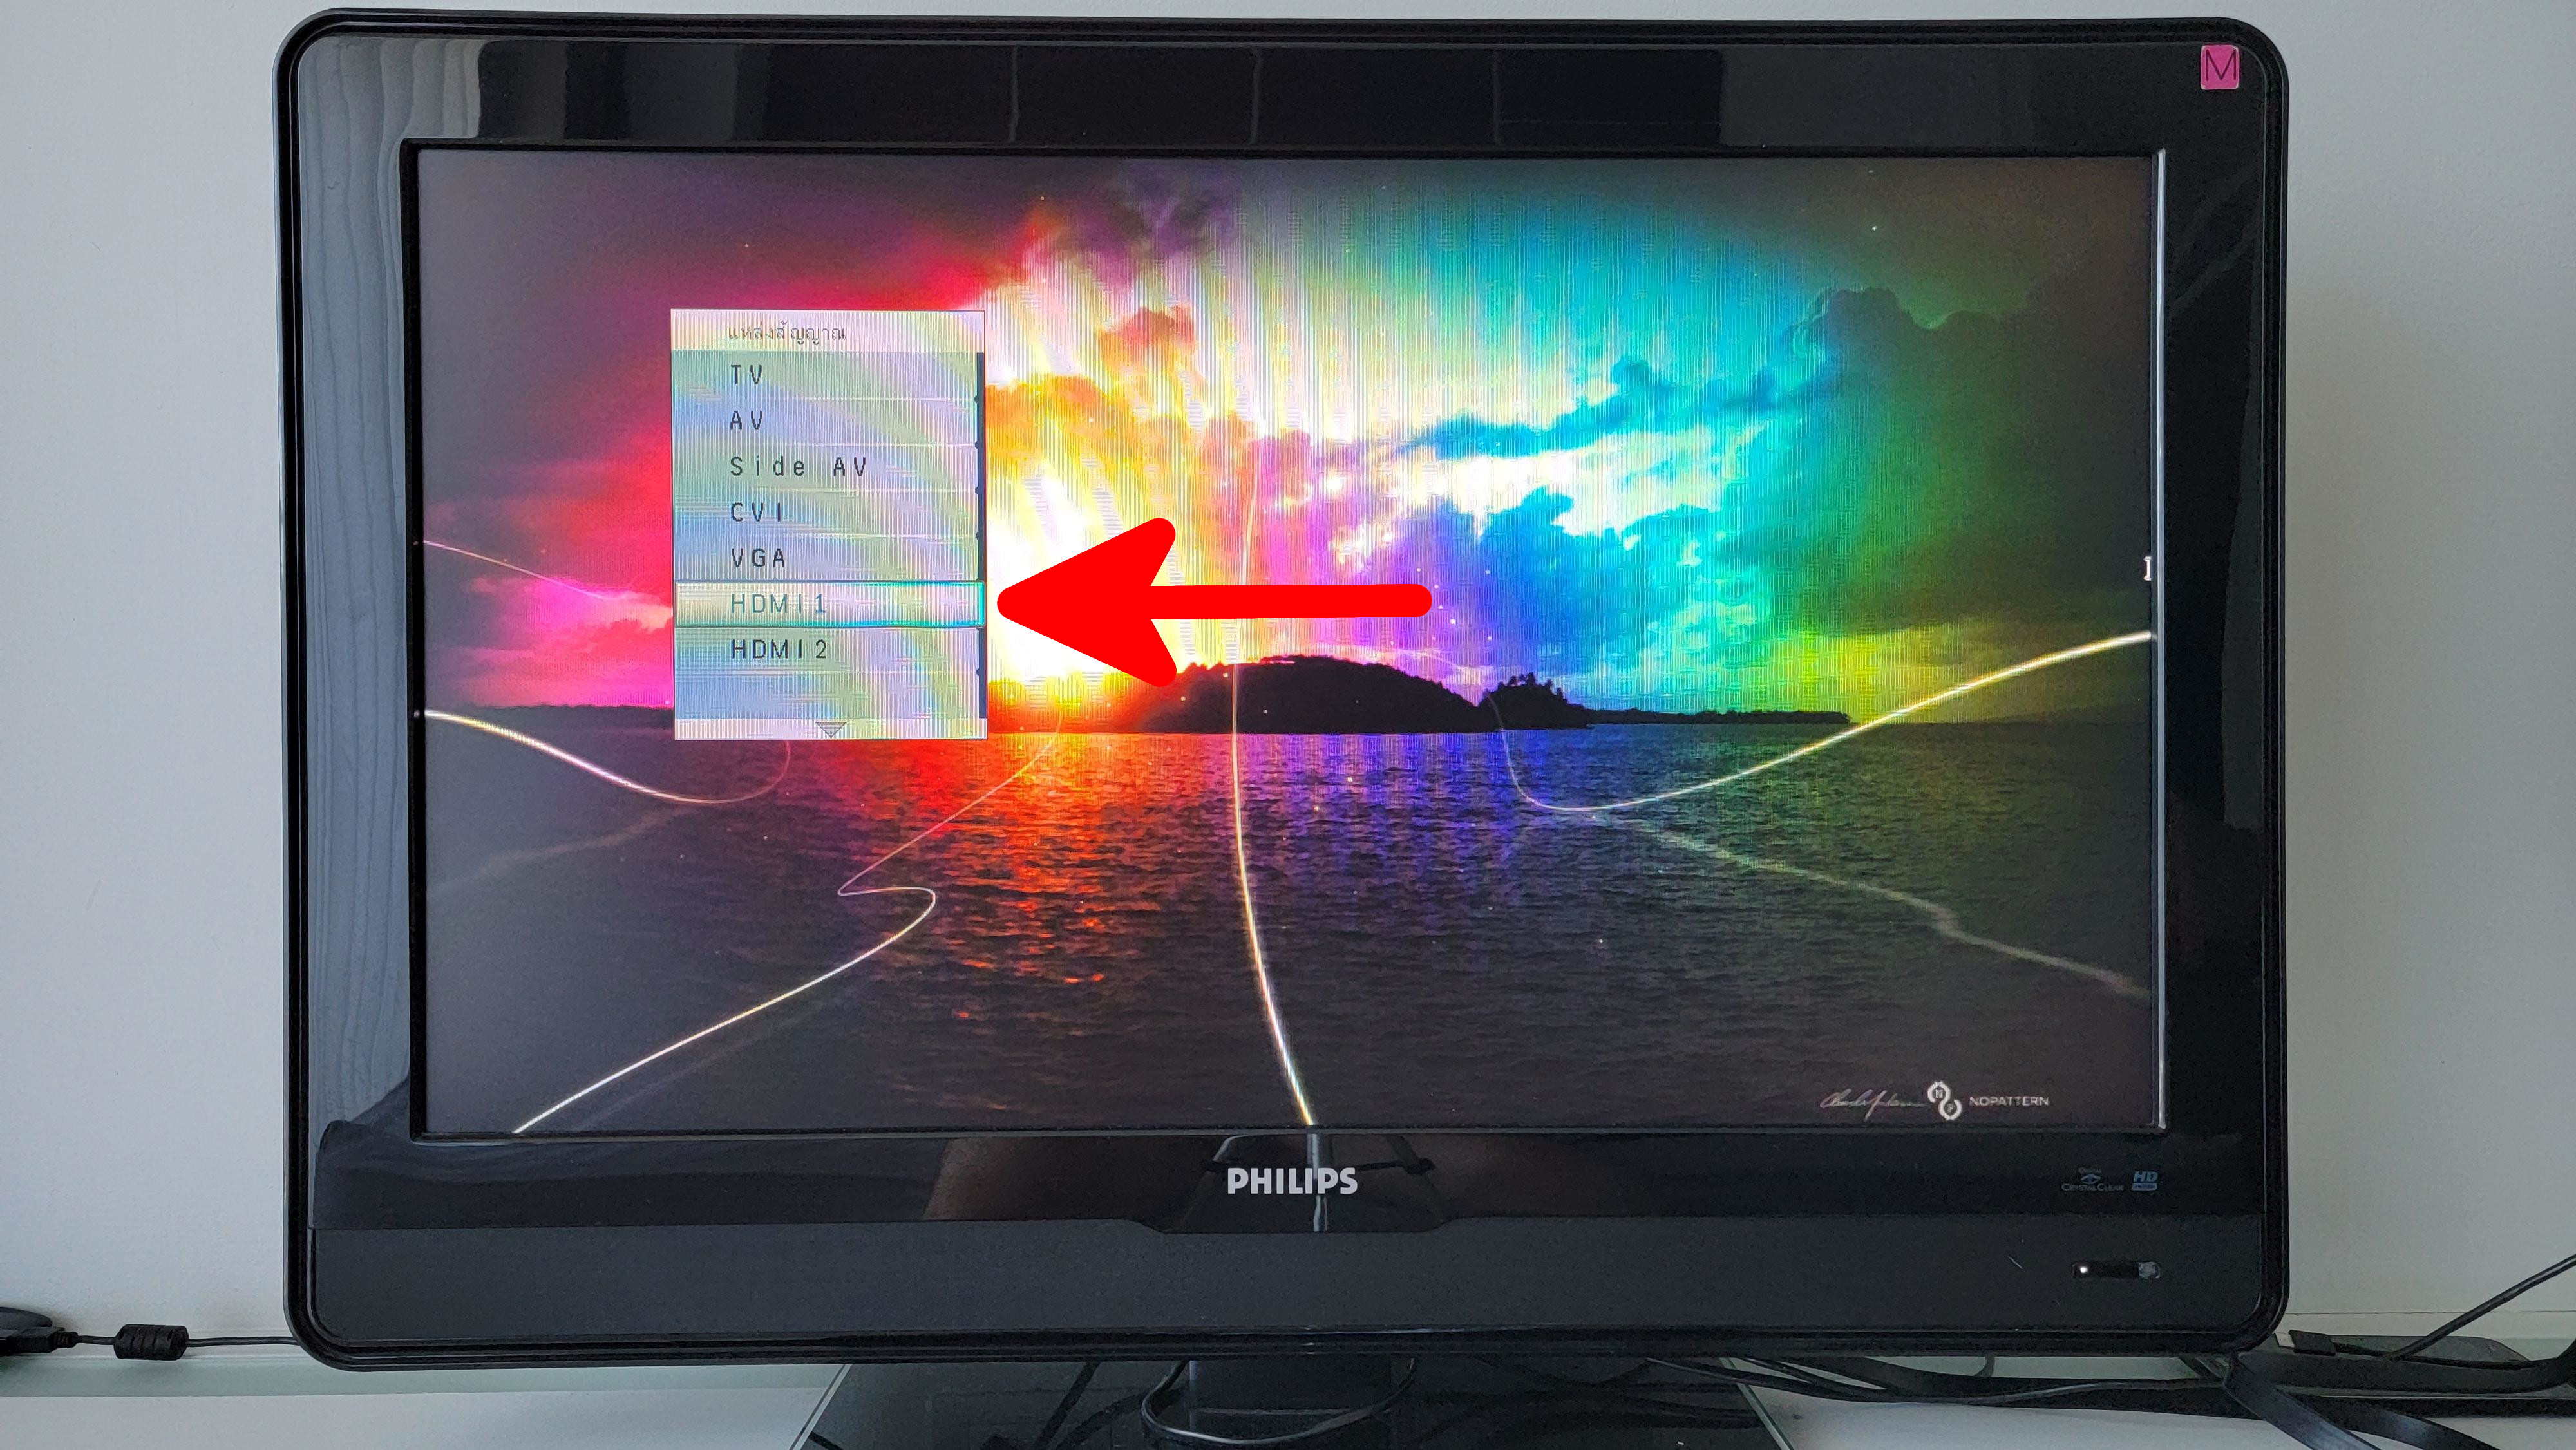
If, after selecting HDMI as the signal source on the TV, you see the message “No Input Signal”, then:
- Select HDMI with a different number.
- Move the wire, it may not be firmly connected to the computer or TV socket.
- Make sure your computer is on.
- The monitor on the computer should not be turned off due to inactivity.
How to use a TV connected to a computer
There are two main modes:
- join displays
- mirror (duplication) of images on both displays
When displays are combined, the total space expands. That is, if you connected another 1920×1080 display to a computer with one 1920×1080 display, then now the resolution of your virtual screen becomes 3840×1080, if there are three such displays, the resolution will become 5760×1080. You can drag program windows from one display to another. Some apps and games support these wide virtual screens.
When the image is repeated (Mirror), the same image will be shown on both displays.
Among the displays, Primary stands out. This is the one connected first. A feature of the main display is that it shows desktop shortcuts, although this can be changed in the settings.
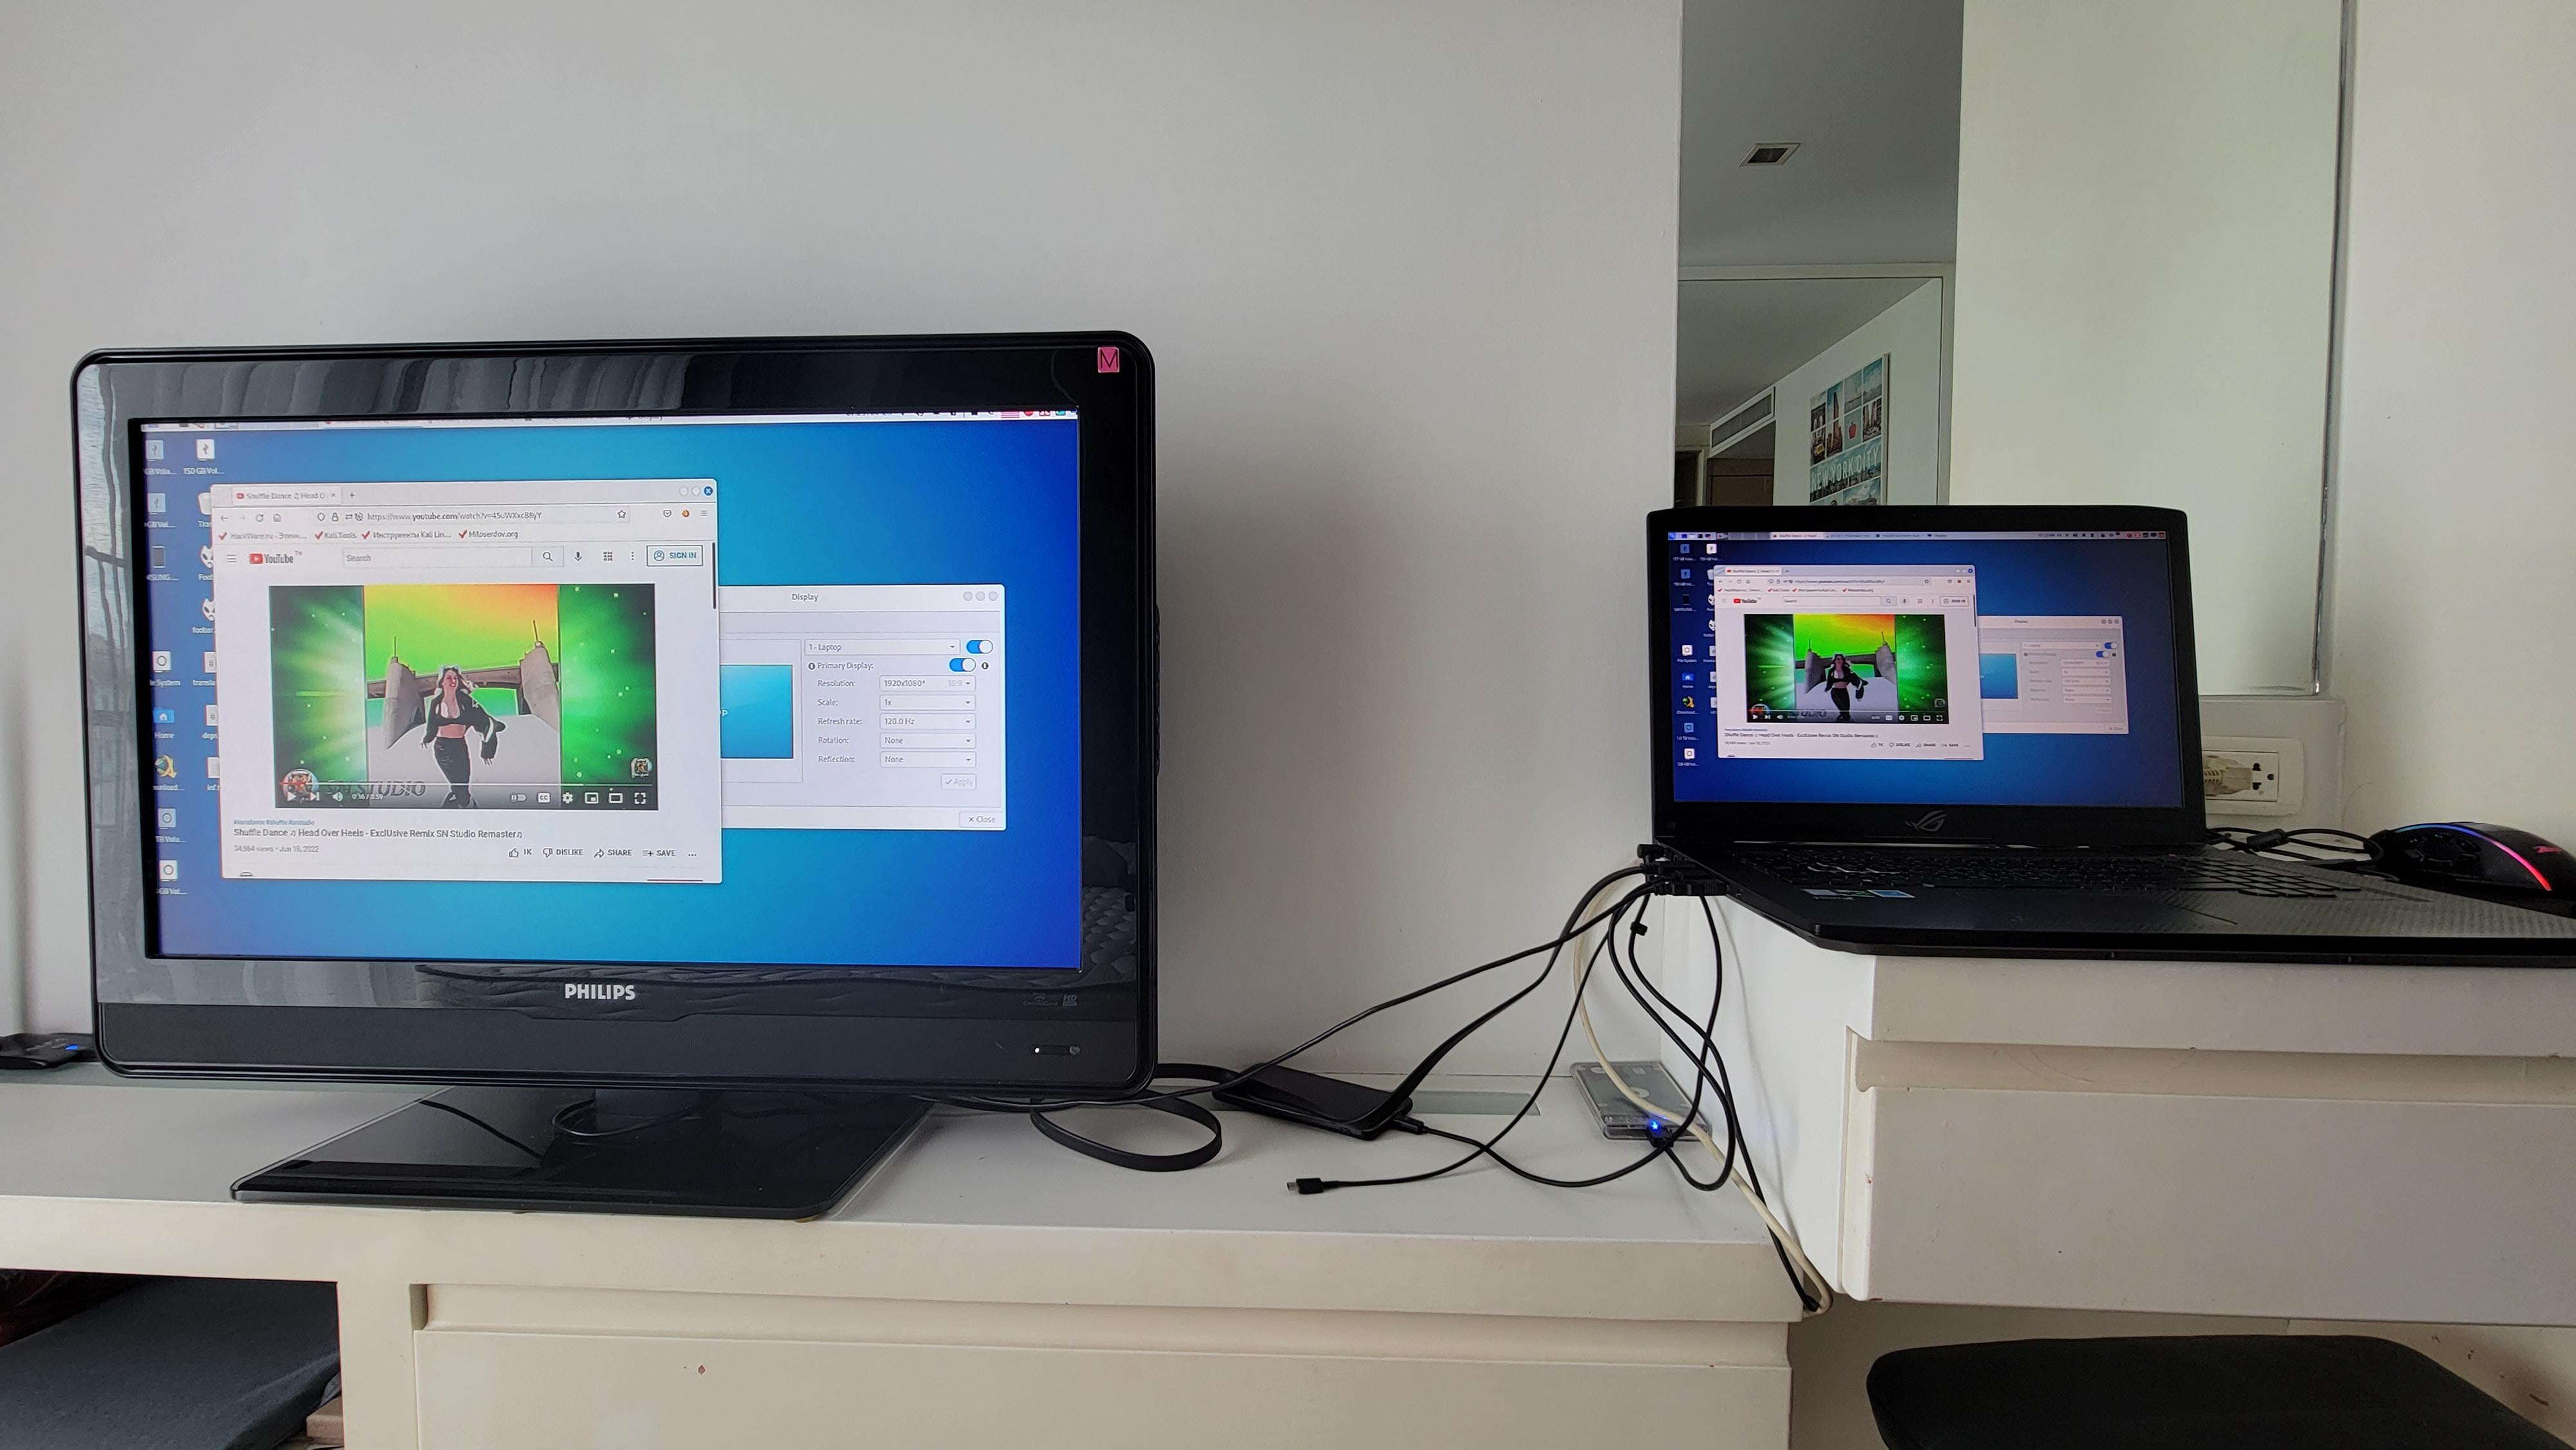
In the next video, the TV is connected to the computer. To play a YouTube video on a TV, the web browser window is dragged from the monitor to the TV. The video begins by selecting HDMI as the audio output source to play audio on a TV instead of playing it on a computer (laptop).
Where are the settings for the second display and TV
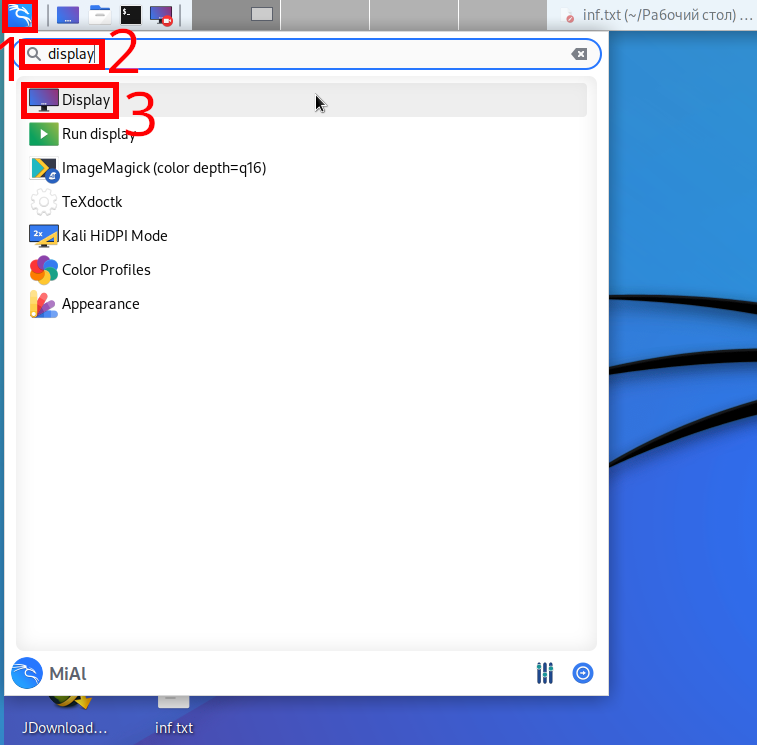
Open Settings (Setting Manager), go to the “Display” section.

Or immediately find the “Display” settings window in the Start menu.
Here you will see the display settings.
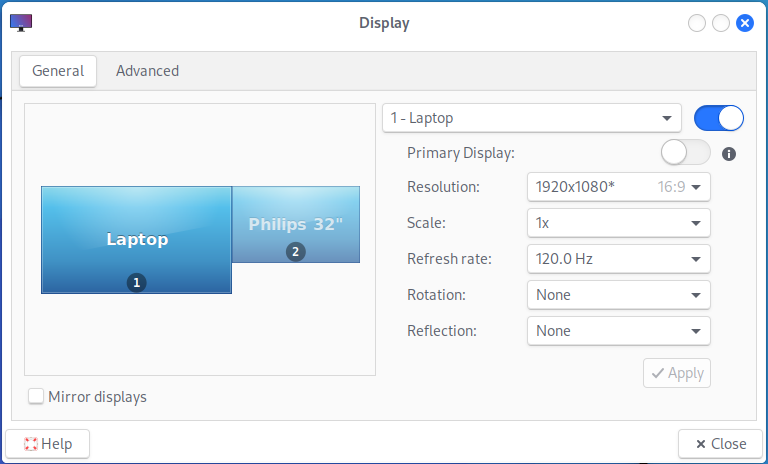
Select the display (or TV) you want to customize.
Each display will have its own set of settings.
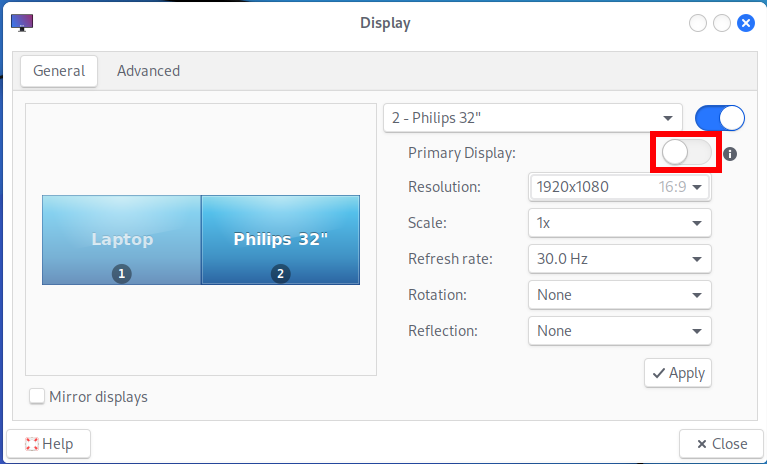
How to install the Primary monitor
By default, desktop shortcuts are shown on the Primary monitor. You can change, i.e. choose a new primary monitor. For this:
1. Open the Settings Manager app, go to the “Display” section.
2. Select the monitor you want to make your primary
3. Activate the “Primary Display” slider next to the monitor name.
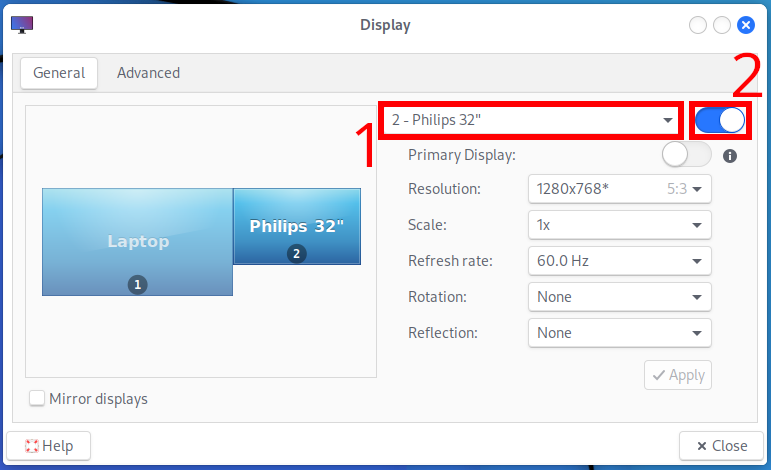
How to turn off the display or TV in the settings, without physically disconnecting
You can disconnect the HDMI cable from your TV or computer at any time, but this is not always convenient. In addition, you may want to turn off the computer monitor or the laptop's built-in monitor.
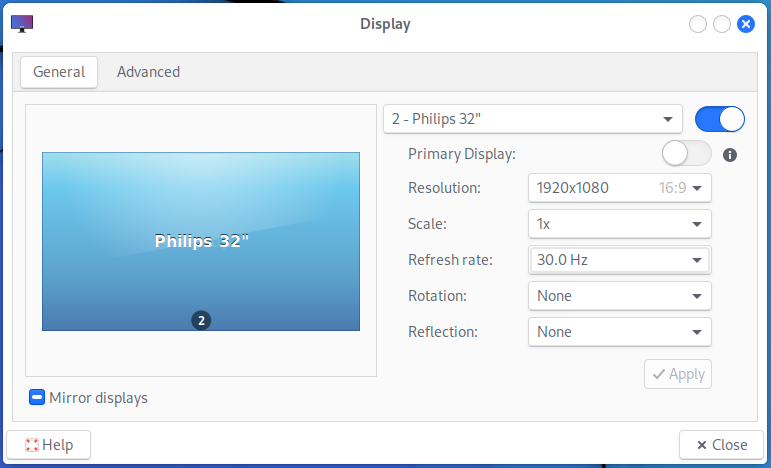
To turn off any monitor or TV in settings, open “Display” settings.
Select the monitor you want to turn off – this can be done by clicking on the schematic image of the monitor with a number or by selecting the name of the monitor from the drop-down list.
Then turn off the monitor using the slider marked 2 in the screenshot.
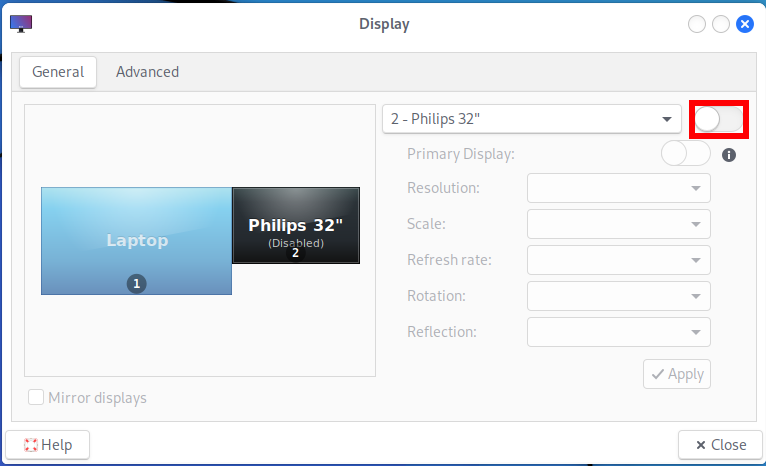
A disabled monitor will stop working (it will no longer receive an input signal), but the disabled monitor will still be available in the settings. You can turn it back on at any time.
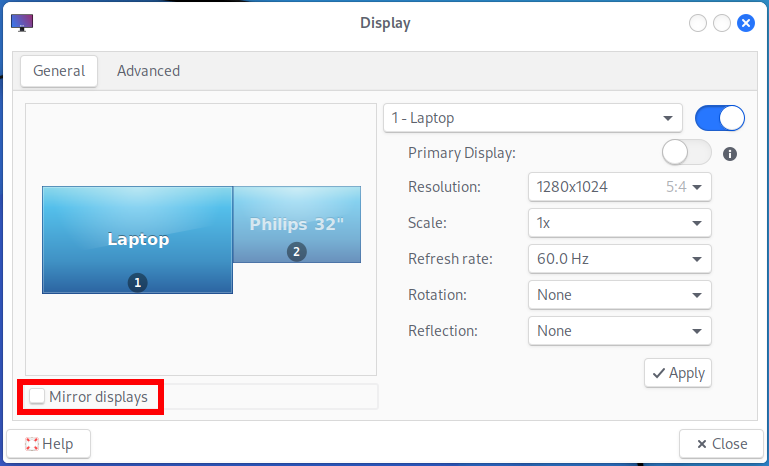
How to make the TV show the same thing as the monitor
Go to Setting Manager → Display.
Select the “Mirror displays” option.

You may notice that the display sizes are not the same – this is due to the fact that they have different screen resolutions.

To ensure that the image is exactly the same on both displays, select the same screen resolution.
Please note that when “Mirror displays” is selected, the "Primary Display" option becomes unavailable because both monitors become equal.
As a result, the resulting settings for both monitors at once will be shown.
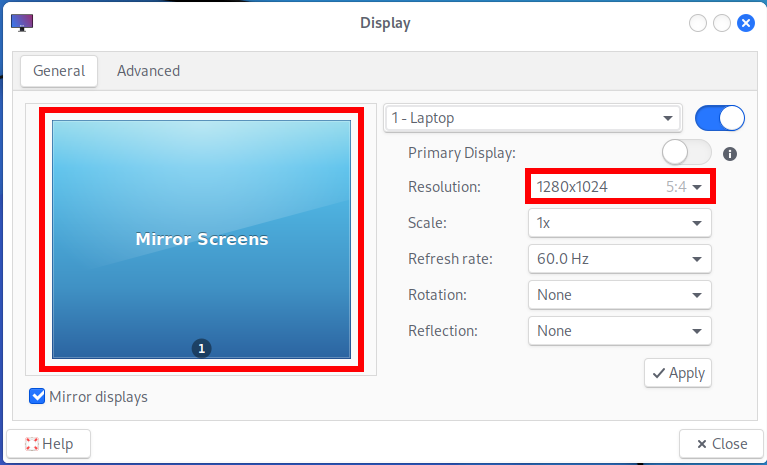
Now the image on the monitor and TV is the same:
How to make the TV become an extension of the monitor
Go to Setting Manager → Display.
Disable the “Mirror displays” option.
In this case, one of the monitors will be considered the main one. In this case, each of the monitors will show its own desktop, which, in fact, is one.

Why can't I drag the program window to the second screen
If you see two displays in the settings, but you can’t drag the program window to the TV or the second display, then try dragging the window to the other side. That is, if you, for example, are trying to drag a program window to the left side, then try dragging it to the right side instead.
The fact is that the physical location of the second monitor (TV) and its location in the settings can be different. To fix this, swap the monitors in the settings:

In addition to the location of the monitors to the left and right of each other, other options are possible.
You can place one of the monitors (or TVs) above the other.
In this case, the screen resolution and desktop area will change accordingly.
If you have many monitors, you can place them however you want, not all monitors need to be in a straight line horizontally. You can arrange them, for example, as 3×2, that is, two rows of 3 monitors.
After changing the relative position of monitors in the settings, shortcuts and the taskbar moved to another monitor
If you swapped them in the monitor settings, then the desktop shortcuts and the taskbar are most likely moved to the leftmost monitor (TV). This is due to the fact that by default it is set in the settings that the Desktop shortcuts and the Panel are placed automatically, without being tied to the Primary display. How to make the Desktop shortcuts and Panel show on the Primary monitor is shown below.
Customizing the Xfce Panel, Desktop shortcuts and Notifications on a computer with multiple monitors
Options related to advanced settings for your TV or second monitor are located in the following settings sections:
- Panel
- Desktop
- Notifications
All of these settings can be quickly accessed at once by going to Setting Manager → Display and then clicking the letter “i” next to the “Primary Display” enable slider.

You will see the following window:
The primary display is currently configured to show
- Xfce Panel
- Desktop icons
- Notifications
In this window, you can click the “Configure” buttons next to the setting you want to change.
How to make the taskbar show on the main monitor
Go to Setting Manager → Display, click the “i” next to the “Primary Display” slider.
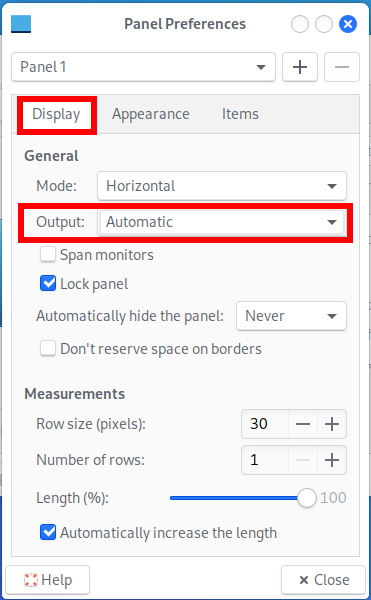
Opposite “Xfce Panel” click the “Configure” button.
On the “Display” tab, find the “Output” setting.
Several options will be offered:
- Automatic (that is, on the very first (left) monitor in the settings)
- Primary (on the main monitor)
- HDMI-1 (monitor connected via HDMI cable)
- ePD-1 (laptop built-in monitor)
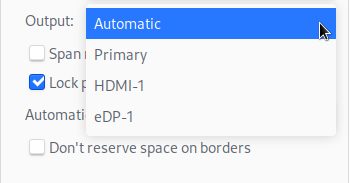
To show the taskbar on the main monitor, select the “Primary” option.
How to make the taskbar show on all monitors
If you want the taskbar to be shown on all connected monitors and TVs, then follow these steps.
Go to Setting Manager → Display, click the “i” next to the “Primary Display” slider.
Opposite “Xfce Panel” click the “Configure” button.
On the “Display” tab, find and activate the “Span monitors” setting.
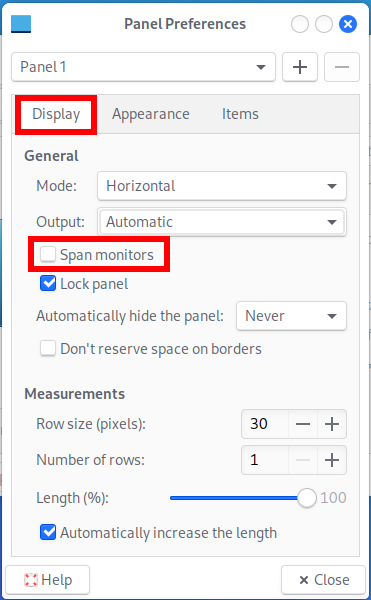
After that, the Taskbar will be shown on all monitors. Open programs will be added to the taskbar from left to right. That is, at first the taskbar will be filled on the very first (left) monitor and then it will start to fill on the subsequent ones.
How to set different desktop wallpapers for monitor and TV
You can set a different desktop wallpaper for all connected monitors and TVs.
To do this, go to Setting Manager → Display, click the letter “i” next to the “Primary Display” enable slider.
Opposite “Desktop icons” click the “Configure” button.
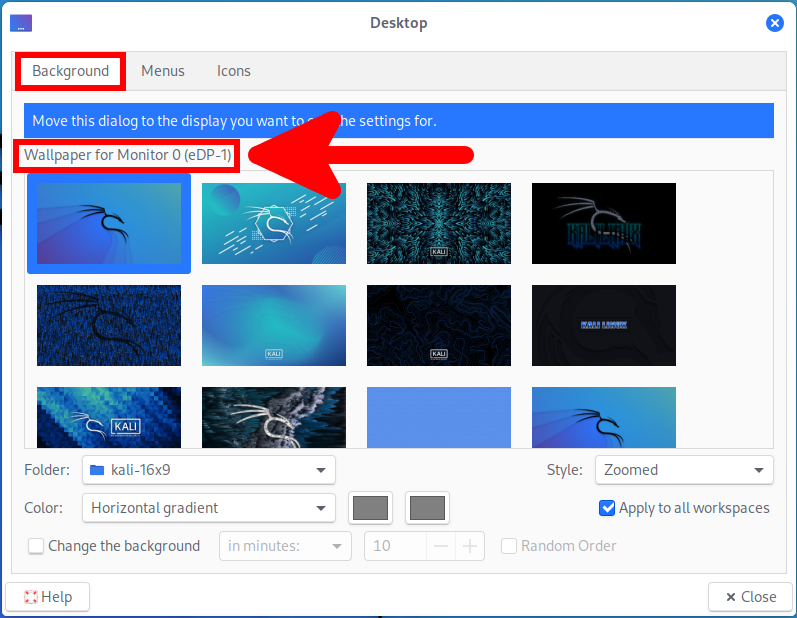
You will see something like this:
Move this dialog to the display you want to edit the settings for
That is, in order to change the desktop wallpaper, you need to move the window that opens to the monitor (or TV) for which you want to set a new wallpaper.
For example, the inscription “Wallpaper for Monitor 0 (eDP-1)” means that the wallpaper will be set for the monitor built into the laptop.
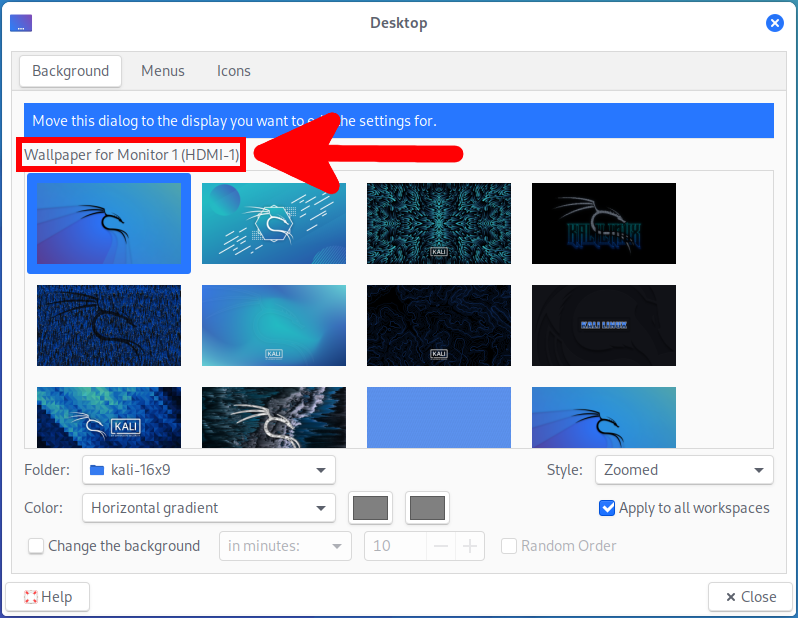
And the inscription “Wallpaper for Monitor 1 (HDMI-1)” means that the wallpaper for the device connected via HDMI cable is currently being configured.
How to make Desktop icons show on Primary monitor
By default, desktop icons will be shown on the first (leftmost) monitor or TV. To change this, go to Setting Manager → Display, click on the letter “i” next to the “Primary Display” enable slider.
Opposite “Desktop icons” click the “Configure” button.
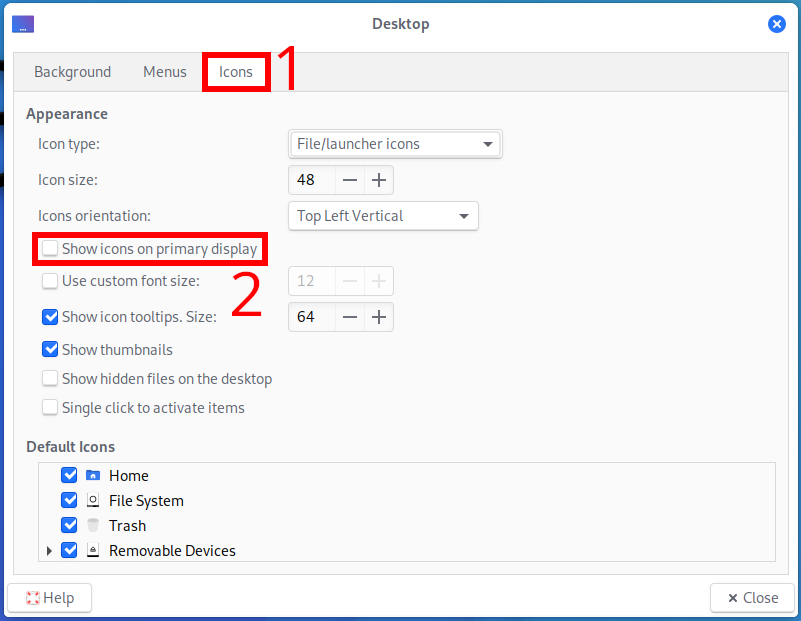
In the “Desktop” window that opens, go to the “Icons” tab.
Find and activate the “Show icons on primary display” setting.
How to make notifications appear on the Primary display
By default, notifications are shown on the display where the mouse cursor is when the notification is displayed. To change this, go to Setting Manager → Display, click on the letter “i” next to the “Primary Display” enable slider.
Opposite “Notifications”, click the “Configure” button.
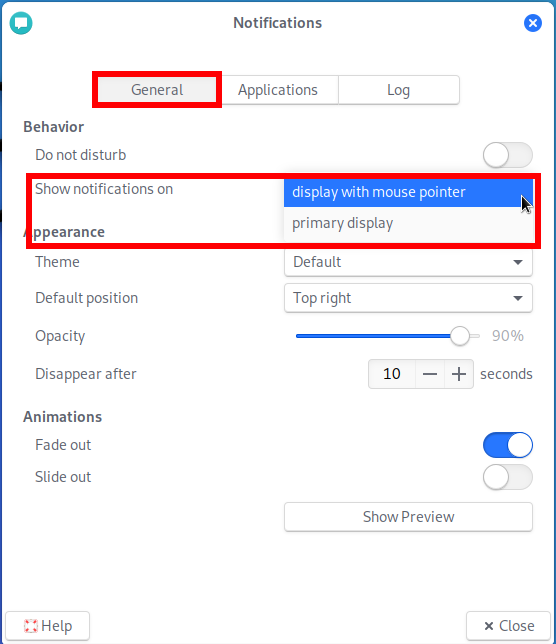
In the window that opens, on the “General” tab, find the “Show notification on” setting and select “primary display” in the drop-down list.
How to make notifications appear on the display with the mouse pointer
Go to Setting Manager → Display, click the “i” next to the “Primary Display” slider.
Opposite “Notifications”, click the “Configure” button.
In the window that opens, on the “General” tab, find the “Show notification on” setting and select “display with mouse pointer” in the drop-down list.

Why are monitors of different sizes in the settings
If monitors have different screen resolutions, they will be shown in different sizes in the settings.
If you wish, you can choose the same screen resolutions for all monitors and TVs.

The same screen resolutions can be set both in the “Mirror displays” mode, and when using monitors to show different areas of the desktop.
Is it necessary to set the same resolution for the monitor and TV
No, it doesn’t need.
Moreover, the TV or monitor may not support the resolution or screen refresh rate that the second monitor supports.
For example, if you have selected a screen resolution of 1920×1080 in the TV settings, but the TV itself only supports 1366×768, then the picture will be displayed with a resolution of 1366×768 anyway.
How to make the monitor display popup windows to identify displays
If you have multiple monitors and you are confused about their settings, then you can enable the display of the name and number on the screen of each monitor.
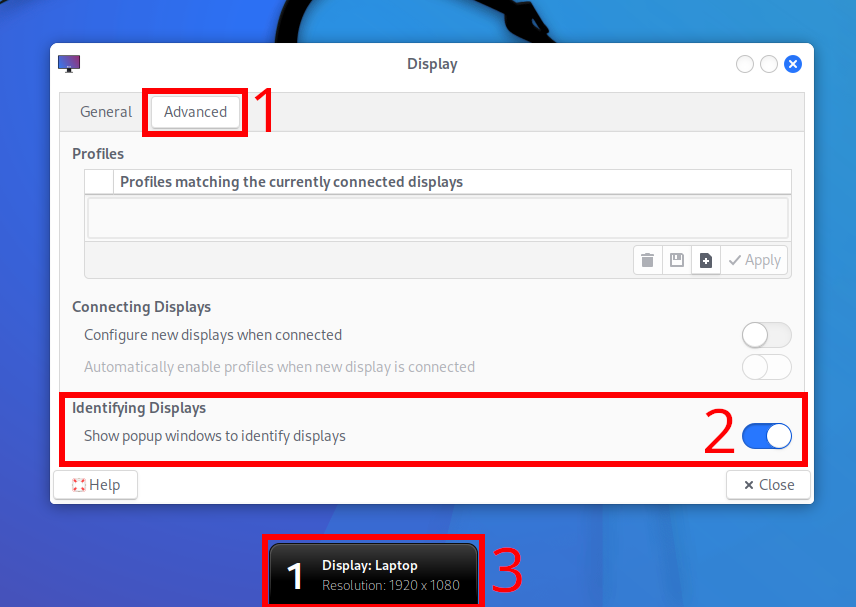
Go to Setting Manager → Display, open the “Advanced” tab.
Activate the setting “Identifying Displays. Show popup windows to identify displays”.
How to remove pop-up windows with monitor names and numbers
Go to Setting Manager → Display, open the “Advanced” tab.
Disable the “Show popup windows to identify displays” setting.
How to enable automatic configuration of connected displays
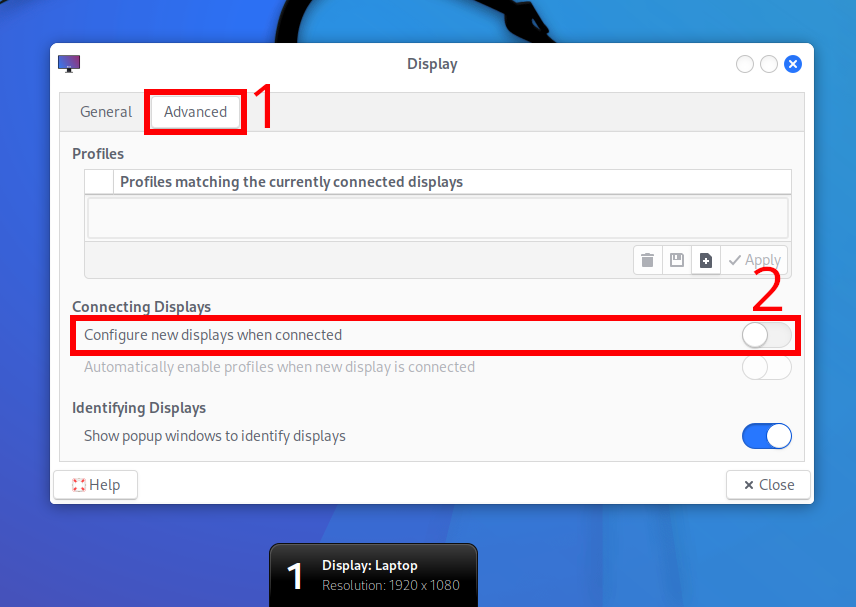
Go to Setting Manager → Display, open the “Advanced” tab.
Activate the “Configure new displays when connected” setting.
How to turn off automatic configuration of connected displays
Go to Setting Manager → Display, open the “Advanced” tab.
Disable the “Configure new displays when connected” setting.
Why is the sound played through a computer (laptop) and not through a TV
An HDMI cable can carry both video and audio. But even after connecting the TV with an HDMI cable, sound is still output from the laptop speakers or computer speakers.
To change the sound output source, go to the sound settings (Volume Control). This can be done via Setting Manager → PulseAudio Volume Control.
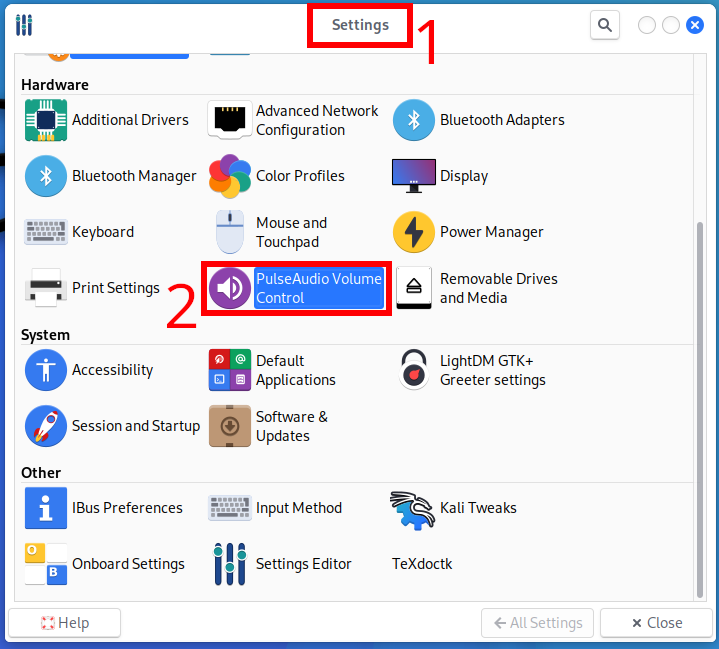
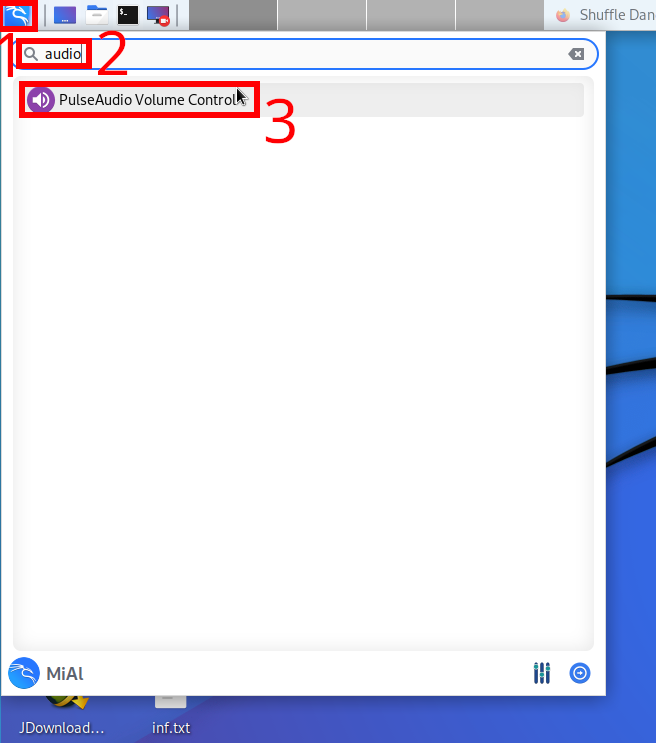
Or find this settings window through the start menu.
Another quick way to get to the sound settings is to click on the speaker icon next to the clock and select “Audio mixer”.

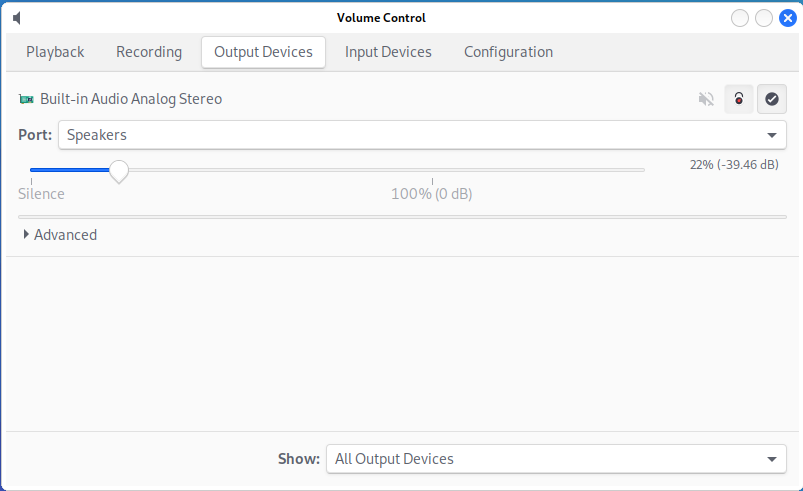
The “Output Devices” tab will open, you can search there for a TV or HDMI device as an audio output source, but in my case there was no such device. Only “Speakers” were available as “Port”.
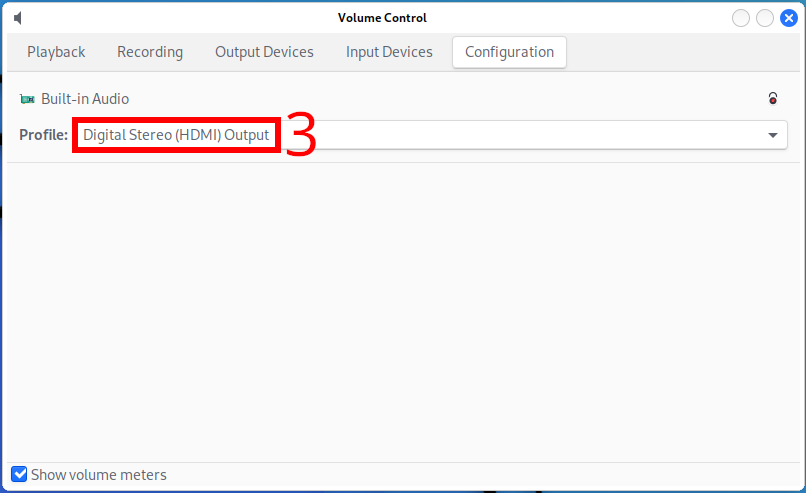
To switch the sound output to an HDMI device, go to the “Configuration” tab and in the drop-down list of the “Profile” setting, select the item with HDMI.
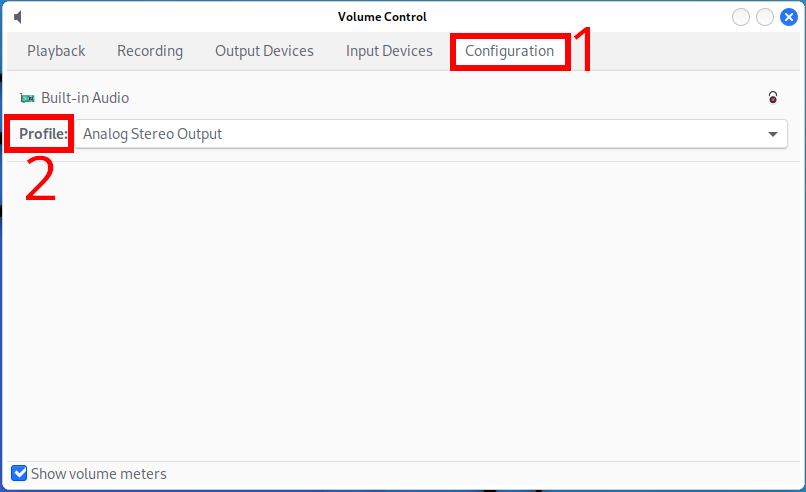
For example, to get the sound through the TV, I chose “Digital Stereo (HDMI) Output” instead of “Analog Stereo Output”.
Why did the sound disappear after turning off the TV on the laptop (computer)
To change the sound output source, go to the sound settings (Volume Control). This can be done through Setting Manager → PulseAudio Volume Control, or find this settings window through the start menu. Another quick way to get to the sound settings is to click on the speaker icon next to the clock and select “Audio mixer”.
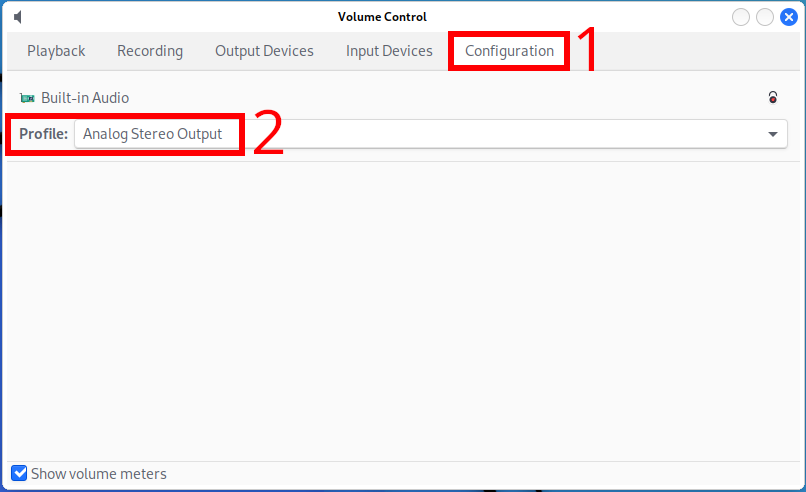
Go to the “Configuration” tab and in the drop-down list of the “Profile” setting, select “Analog Stereo Output”.
Setting the action when closing the laptop lid when using a second monitor
If you are using a laptop, closing the laptop lid when additional monitors are connected to it may not be what you expect. For example, when you close the laptop lid, the computer goes into Suspend (Sleep) mode or shuts down, and you expect to be able to work on a second monitor or watch TV connected to the computer.
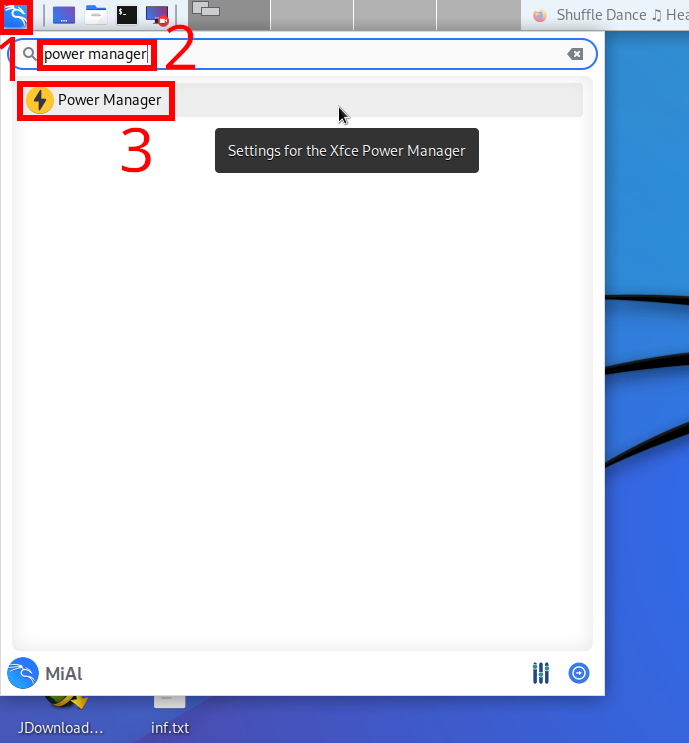
To control how the computer behaves when the laptop lid is closed, go to Settings Manager → Power Management.
You can also find this settings window through the Start menu.
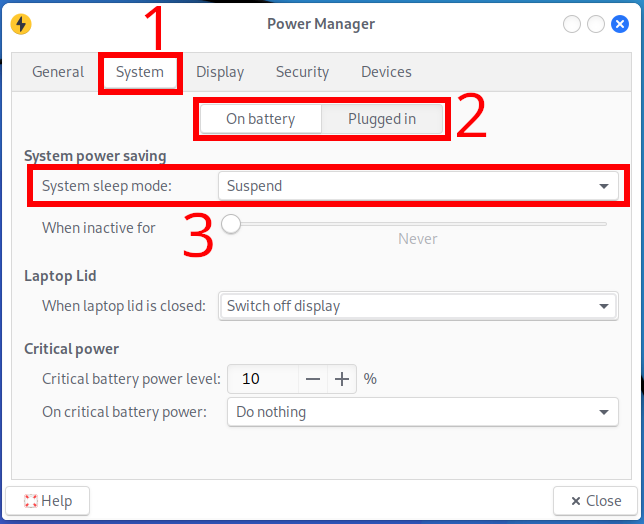
Here in the “System” tab you can change the behavior performed when the laptop lid is closed.
Please note that the behavior of the computer in two modes is separately configured:
- On battery – when the laptop is running on battery power
- Plugged in – when the laptop is running on mains power
The “When laptop lid is closed” setting determines the action that the computer will perform when the laptop lid is closed, even if a second monitor or TV is connected to it.
The following options are available:
- Switch off display – disable built-in laptop display
- Suspend – Stops all applications and puts the computer into low power mode. When you turn on the computer, it returns to the same state that it was before Suspend. The difference from Hibernate is that the computer turns on faster, although it continues to consume energy.
- Hibernate – hibernation mode, writing the current state of the computer and RAM to the hard disk and turning off the computer. When you turn on the computer, it returns to the same state that it was before Hibernate. The difference from Suspend is that the computer completely stops consuming power and cannot lose data due to the fact that the battery is dead. But it turns on a little longer than when exiting the Suspend state.
- Lock screen – Show a screensaver that requires the user to enter a password.

If you do not want the laptop to turn off when the lid is closed, then select “Switch off display” or “Lock screen”.
Related articles:
- How to update the GRUB bootloader on Debian and derivative distributions (Kali Linux, Ubuntu, Linux Mint) (75.6%)
- How to connect a TV to a computer in Linux in Cinnamon (Linux Mint, LMDE) (65.4%)
- How to connect a TV to a computer in Linux in GNOME (Ubuntu) (65.4%)
- How to enable automatic login in Linux (GDM, LightDM, SDDM) (62.1%)
- How to set up automatic login in Linux with LightDM (62.1%)
- Wine is missing from the context menu on Ubuntu (SOLVED) (RANDOM - 50%)